"Any idiot can do a study and make it show whatever they want."

34% of adults in the United States who have tried to lose weight have tried at least one supplement to help. As these are sold as supplements, and sold over the counter, they are not subject to regulation or testing by the FDA. This allows the companies to utilize any products they want, regardless of whether they have ever been tested in a controlled environment to show they help with weight loss.

Due to the robust and growing weight loss market, more and more companies are popping up promising a miracle cure to obesity. Whether it’s using electricity, lasers, natural supplements derived from plants or compounds that work on our hormones, they all promise the same thing – lose weight fast without significant dieting or exercise.

However, as we all learn early on … if something sounds too good to be true it probably is. Let’s start with broad brush strokes. But first, an introduction. I’m Dr. Chris Dietrich, and I’m a teaching physician with an internal medicine residency program. Think of Scrubs or Grey’s Anatomy – I’m one of the attending physicians. This means my residents come to me every day with questions. Some I know the answer to, and some I don’t. When I don’t know the answer, I need to look it up. But I need to make sure what I look up is accurate and correct, as a generation of future doctors is going to take what I tell them and use it to treat patients for the remainder of their careers.

This is where the critical appraisal of literature comes in. When I was a kid, I hated brushing my teeth. The two minutes seemed like an eternity and I had other things to do with my time. I remember saying to my dad “there was a study in the paper that said you only have to brush your teeth for 30 seconds!”   My father was a scientist, so I was hopeful this would convince my father to let me brush my teeth less. Instead, he told me “Any idiot can do a study and make it show whatever they want.” I wouldn’t know how true this was until I started medical school.

There’s big bucks in alternative medicine, and in order to make big money companies need to make sure whatever they’re selling at least looks like it works. As such, companies will build studies to show their drugs work (even if they don’t). This is even worse in the supplement market – these studies tend to be published in journals without real peer review.  They essentially allow the supplement maker to pay to have their study published showing their weight loss drug is a magical cure all. They then tout this data to their customers to justify charging them hundreds of dollars a month.

How do they do this? Imagine for a second I want to prove Tic Tacs cause people to lose weight. So I recruit 50 people, 25 of which are going to eat Tic Tacs, and 25 of which aren’t. Then I watch them over the next 3 months to see who lost weight.  However, in order to make sure my study shows what I want it to, I have the people who are eating Tic Tacs also only eat 1200 calories a day (Tic Tacs included). The other 25 people I will tell to keep eating whatever they want.

Normally this would be caught by peer review when I try to publish, but there are journals out there that are willing to look past that for some extra money. Now I have a study that says “People who ate Tic Tacs every day for 3 months lost 25 pounds compared to people who didn’t!” Suddenly Tic Tacs are the next big thing in weight loss! And if you think to yourself – “well I would see that the people eating Tic Tacs were also eating way fewer calories” – when was the last time you read the study of the weight loss supplement you were taking?

In medical school we learn how to see through these poorly designed studies. You look at their data and what they did to manipulate it. And we also learn what journals and types of studies are more trustworthy. So now whenever someone asks me about a drug or treatment, I always look at studies through this lens of “critical appraisal”.

Back to the broad brush strokes – in 2021 a group of doctors looked at 315 studies identifying supplements used for weight loss. Of these, only 16 actually showed weight loss. Of the 16, the degree of weight loss ranged from less than one pound to ten pounds during the study. The authors note many of the studies were paid for by the supplement maker, or were of a very small group of people or over a very short period of time. When this occurs, the information the study shows is much more likely to be due to chance, and not because of the effect of the supplement.

Next let’s look at specific claims of a supplement (which costs well over $50 a month, and they suggest be taken in conjunction with other supplements which also cost over $50/month).

Estro-One – this is marketed as an estrogen blocking supplement to help men lose weight. The theory is that estrogen causes men to gain fat and have a hard time losing it. But this isn’t the truth! At least not the whole truth. Fat tissue is estrogenic – meaning it actually creates estrogen. Men and women with obesity tend to have higher estrogen levels than non obese people. It’s hard to say the estrogen is what causes you to be obese when it’s the fat tissue making the estrogen.

And this isn’t just a “Which came first, the chicken or the egg?” scenario. In the 1990’s, there was a group of men who had a genetic abnormality causing them to not make estrogen. These men were found to have increased central obesity, insulin resistance (leading to diabetes) and increased incidence of non-alcoholic fatty liver disease. Because they DIDN’T have estrogen.

In the early 2000’s scientists set out to prove it was in fact lack of estrogen that caused these men to be obese. To do this they took a group of male mice, and in half of them changed their genetics so they would not make estrogen. These male mice exhibited increased central adiposity that became more pronounced with age, to the point by the time the mice were older they had twice as much fat tissue as their estrogen normal counterparts.

Male mice with an aromatase deficiency, which inhibits the conversion of testosterone to estrogen, were also found to have more fat tissue and actually had decreased physical activity and glucose oxidation. These mice actually made more fatty acids in their livers, had higher insulin resistance levels and higher incidence of fatty liver disease. This is important as there are several weight loss supplements on the market that tout they “inhibit the conversion of testosterone to estrogen”. 

This was legitimately the first supplement I came across for weight loss, and the very idea of how it works is flawed. It sounds good in theory – as a man I don’t want estrogen. But it isn’t true. I did a cursory search into several other supplements, and came up with similar flaws for every one of them. Every. Single. One. Some utilize chemicals or compounds which in theory may work to help people lose weight, but it’s never been proven to actually work in humans over extended periods of time. That doesn’t mean it couldn’t work, but it does mean it hasn’t been proven to work. 

So, before you waste money on the next miracle weight loss cure, consider talking to your doctor about it first. They can look to see if there is any evidence it actually works, or even if the theory behind how it works makes sense. There are products out there that can help you lose weight, but they need a prescription pad and a doctor’s approval to be prescribed. This is why I always recommend people see a board-certified weight loss specialist to help them lose weight. 
Cheers! Navigating Winter Drinks

Cheers!  Navigating Winter Beverages

“Alcohol may be man’s worst enemy, but the bible says love thy enemy.” – Frank Sinatra

We are now well into the holiday season, with snow here to stay until at least next March here in Montana.  While I love the holidays (the first snow, the holiday lights, carols playing in stores, etc.) the sheer number of events and parties overflowing with alcohol and endless appetizers can do a number on anyone’s waistline.  As I love to partake in all things merry and bright, I’ve learned a few tricks over the years to mitigate the damage, at least a little. 

First, consider how much you WANT to drink before you go.  Not only could this potentially save you from a lot of excess calories, but drinking more than intended may have disastrous consequences when driving.  So, take a pause before you go, consider how long you will be at the party, if you need to eat something before going, and how many beverages you want to consume.  It’s too easy to over-indulge - you start with a cup of something, get distracted, get a refill, talk to someone else, get offered another refill and so on. 

Second, consider WHATyou want to drink.  In the land of holiday drinks, there are many delicious choices… Sooo many delicious choices!  Which is good, because some drinks can ruin even the most diligent of diets because of the sugar content.   Choosing drinks that are lower in calories, but still give your taste buds a zing, can help keep things in check.  For example, champagne is 90 calories per glass and tastes amazing with just about every food.   Red and white wine are generally low sugar choices that one can sip on throughout the evening.  Any of the hard alcohols (whiskey, bourbon, tequila, etc.) over ice or straight up are around 100 calories.  Vodka soda, gin & tonic, or rum and diet coke are easy to order and won’t break the calorie budget.  For a beer, consider a blonde ale like Kona Light or something like a Corona Premier.  They’re around 100 calories per bottle and significantly better than some other light beers in my opinion.

However, if you’re feeling something more exotic or highbrow such as a martini, keep it clear!  What I mean by that is that if you can’t see through it, it’s probably packed with sugar and calories.  A vodka or gin martini will run you about 175 calories whereas any version of a chocolate martini is going to be over 300 calories per drink.  A White Russian is going to be around 250 calories a glass.  So, if you’re in the mood for something sweeter, consider a paloma (the sour cousin of a margarita) or a mojito.  Both are about 165 calories and pack a ton of flavor if done well. 

Regardless of the libation that you choose, keep track throughout the night and know your limits.  A lot of times I will also throw in a glass of sparkling water with lemon between drinks just to make sure I’m staying hydrated and give myself a chance to avoid the effects of the last drink.  It’s a great way to keep enjoying the party with a drink in hand without things getting out of hand ;). 

Prost! Here's to a holiday season filled with love, cheer, good friends and family.

Chef Jeremy's Butternut Squash Soup

weight loss clinic Billings montana physician diet

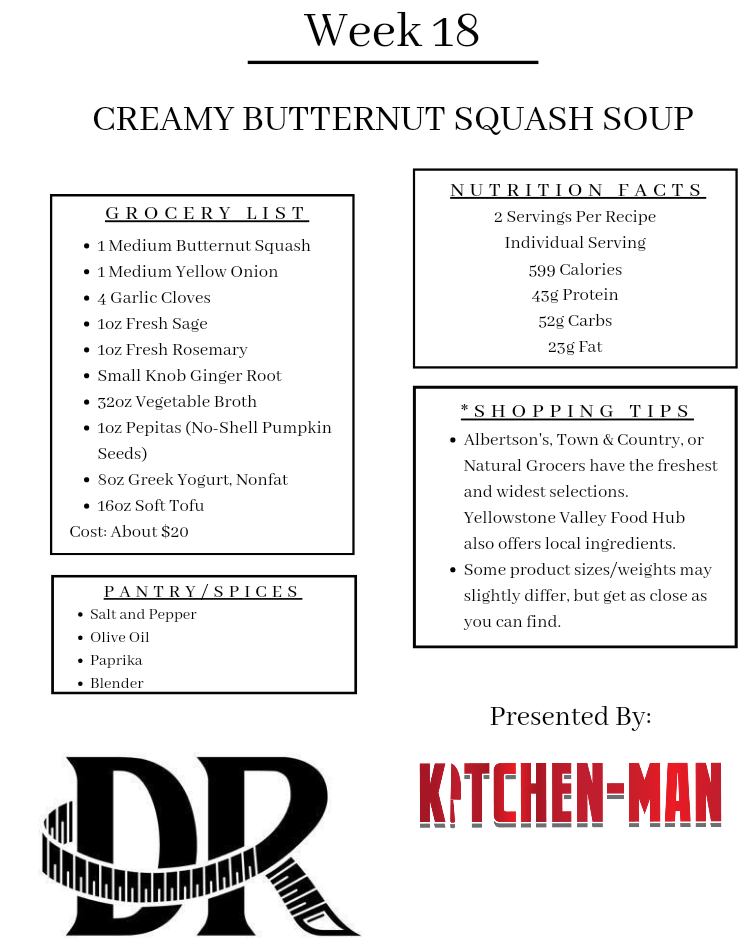
Creamy Butternut Squash Soup

1 Medium               Butternut Squash (4 cups diced)

1 Medium               Yellow Onion

4 ea                            Garlic Cloves

1 Tbsp                       Sage, preferably fresh but dried is ok

½ Tbsp                      Rosemary, preferably fresh but dried is ok

1 tsp                          Ginger Root or Ginger Paste

3-4 Cups                   Vegetable Broth

16 oz                         Soft Tofu

2 tsp                          Salt

1 tsp                          Paprika

1 Cup                         Greek Yogurt, nonfat

2 Tbsp                       Pepitas, or Pumpkin Seeds with no shells

  1. Start by removing the ends of the Squash and peeling all the thick skin off until all you see is the vibrant orange inside. Cut the Squash in half lengthwise, then scoop out the seeds and “guts” with a spoon. Dice the squash into ½ inch cubes. Heat a large soup pot over medium heat and add 1 tsp of Olive Oil (opt.). Add diced Squash to the pot and begin cooking.
  2. While Squash cooks, cut the Onion into large dices, then add to the pot as well. Also add the 4 whole Garlic Cloves. Because this recipe involves blending, there is no need to cut the smaller ingredients. If you’d like, give the Sage and Rosemary a rough chop and add to the pot.
  3. Peel the Ginger, if you’re using whole Ginger, then roughly chop to measure out 1 tsp and add to the pot. If you prefer Ginger Paste, just measure 1 tsp and add it to the pot.
  4. Allow all the ingredients to cook together for about 5-10 minutes or until Squash is semi-soft, to bring out all the best flavor.
  5. Open the Tofu and drain any excess liquid. Add the Tofu and Vegetable Broth and bring to a simmer. Because the Tofu is soft, you won’t need to cut it, just mash it up into smaller pieces with the spoon or spatula while it cooks. Allow the pot to simmer for about 5 minutes to cook everything soft enough to blend.
  6. Once everything in the pot is cooked and soft, add the hot soup to the blender, in batches if necessary, and blend until smooth. Pour the soup into a large bowl and season with 2 tsp of Salt and 1 tsp of Paprika. Then whisk in the Greek Yogurt until smooth and lighter in color. The Yogurt is mostly to help with acidity and texture, so it can be optional how much you add, just try not to exceed 1 cup or the calories will be over 600 per serving.
  7. Divided the soup into 2 bowls, then garnish each bowl with 1 Tbsp of Pepitas and enjoy!

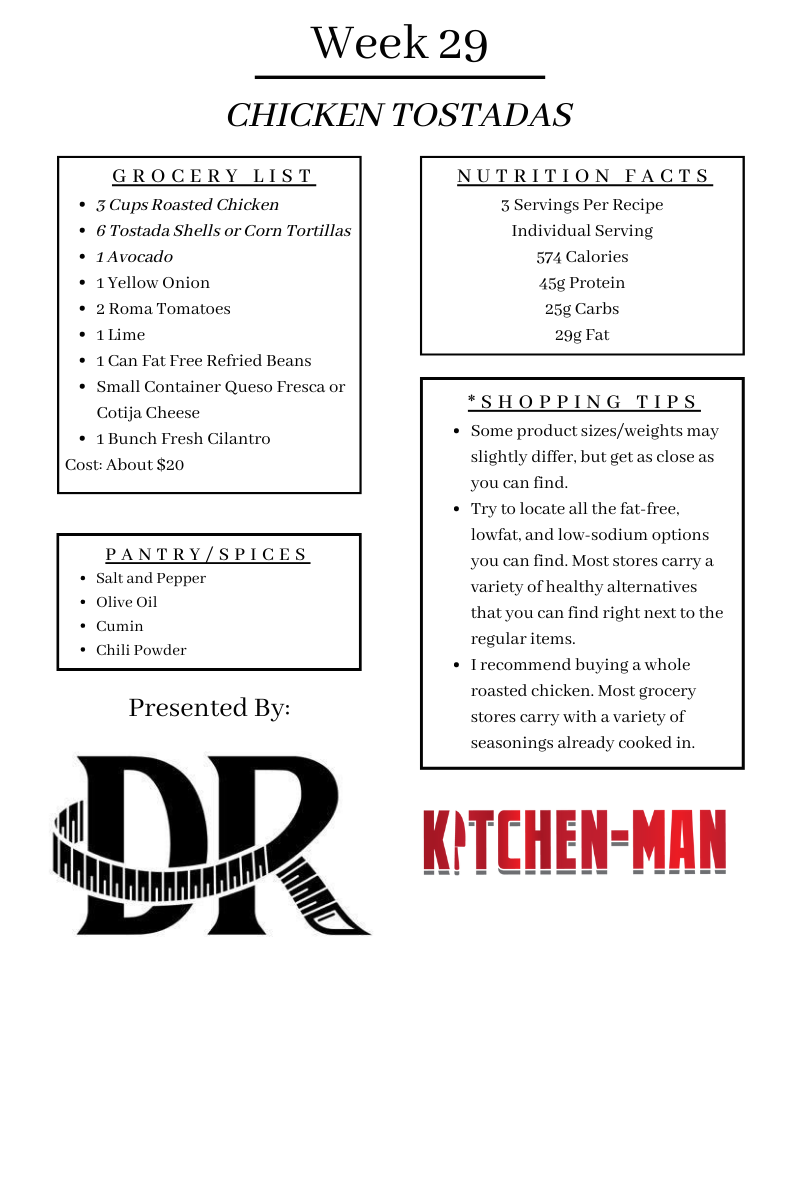
Chef Jeremy's Chicken Pot Pie

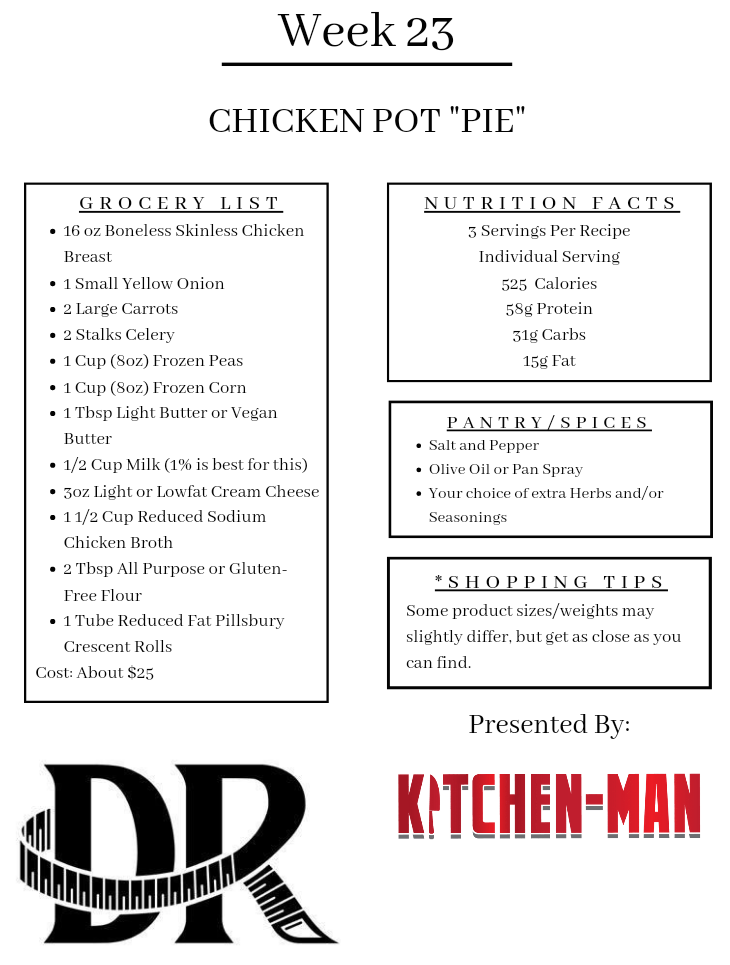
Chicken Pot “Pie”

Chicken Pot Pie weight loss Billings montana health diet

16oz    Boneless Skinless Chicken Breast

1 Can   Reduced Fat Pillsbury Crescent Rolls

1 Tbsp Light Unsalted Butter

2 Tbsp Minced Garlic Cloves

½ Cup  Diced Yellow Onion

1 Cup   Diced Carrots

1 Cup   Diced Celery

1 Cup   Frozen Peas

1 Cup   Frozen Corn

½ Cup  1% Milk

3oz      Light or Low-Fat Cream Cheese

2 Tbsp All Purpose Flour

1 ½ Cups Low Sodium Chicken Broth

Salt and Pepper to taste

  1. Preheat oven to 425 degrees. Place Chicken Breasts into a lightly oiled baking pan or dish. Season each Breast with a pinch of Salt and Pepper. Place pan in oven and cook for 25-30 minutes, or until Chicken is fully cooked to 165 degrees internally.
  2. While Chicken is cooking, prepare the vegetable gravy by dicing all of the fresh vegetables into ¼ inch pieces. Measure out the correct amount of Garlic, Onion, Celery, and Carrots, then place them all into a bowl.
  3. Melt the Butter over medium-high heat in a large sautee pan. Once Butter is melted, add the bowl of diced vegetables to the pan and cook for 5-7 minutes or until tender.
  4. Once the fresh veggies have softened, add a pinch of Salt, Pepper, and any other seasonings you wish to use. (I recommend Garlic Powder, Onion Powder, and some Fresh Herbs, but the flavor is up to you.)
  5. Add the Flour to the Vegetables and stir it in, cooking for about 1 minute. Then add the Chicken Broth, stir it in, then allow it to come to a boil. Once boiling, reduce heat to medium and cook for 5 minutes to thicken it into a Gravy consistency.
  6. At this point, the Chicken should be just about done. Remove it from the oven if it is fully cooked and allow it to rest for a few minutes. Turn oven down to 375 degrees.
  7. While the Chicken is resting, add the Milk and Cream Cheese to the Gravy filling and stir it in over medium-low heat. Open the Crescents, roll them up, then place them on a sheet pan with parchment, if available. Bake them in the oven for 11-13 minutes.
  8. Cut the Chicken into small cubes then add it to the Gravy. Also, add the Peas, Corn, and a pinch of Salt and Pepper. Let it simmer until the Crescents are finished.
  9. Once Crescents are done, scoop some of the Pot Pie Filling into a bowl or over the top of a Crescent Roll. You can also eat it like soup and use the Crescent as a dipper, topper, or cube it up and stir it in. This is a fun and simple twist on Chicken Pot Pie, so enjoy it any way you like!

Chef Jeremy's Chicken Salad

Chef Jeremys Chicken Salad

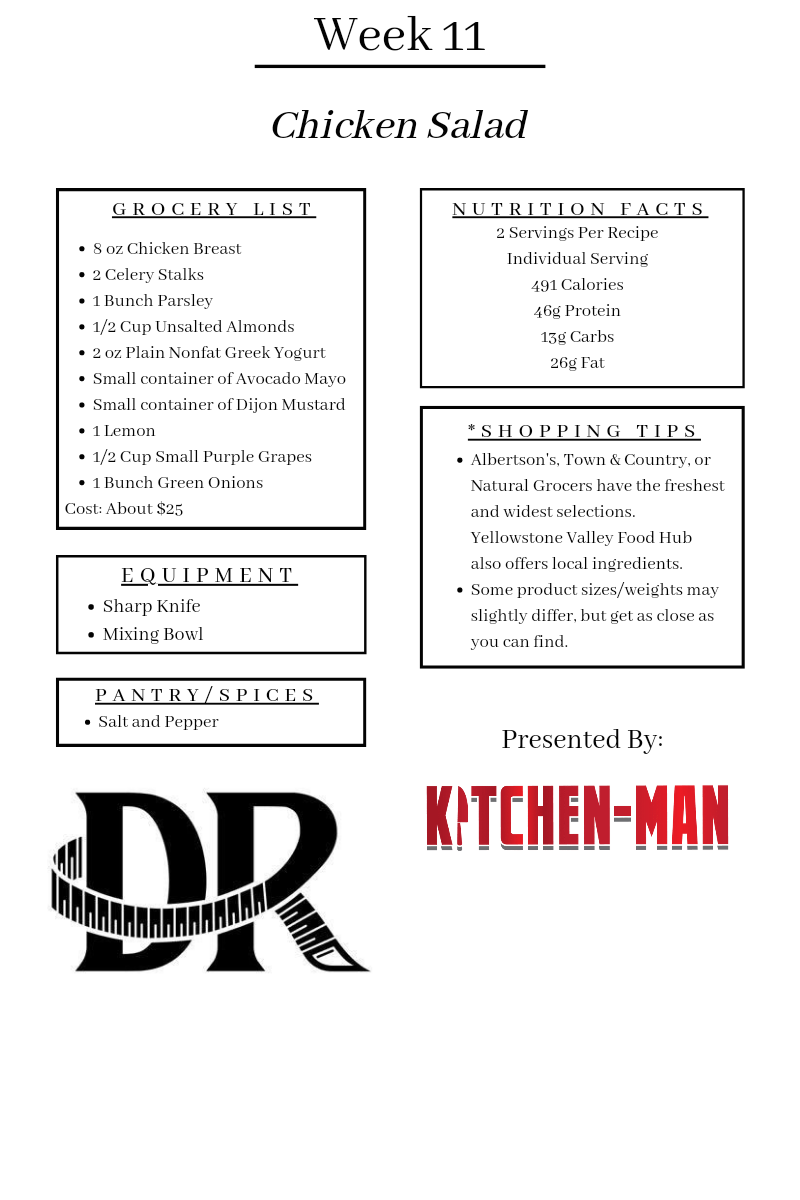
Chicken Salad

8 oz Chicken Breast

2 Stalks of Celery

3 Tbsp Chopped Parsley, save the rest for seasoning the chicken

½ Cup Whole Grapes

¼ Cup Sliced Green Onions

1 Lemon, cut in half

½ Cup Chopped Unsalted Almonds

¼ Cup Plain Nonfat Greek Yogurt

2 Tbsp Avocado Mayo

1 tsp Dijon

¼ tsp Salt

¼ tsp Black Pepper

  1. Before preparing our salad, we will need to fully cook the Chicken Breast. You can do this any way you would like, but I will describe the poaching method. If you have a large Chicken Breast, cut it in half and place it into a medium pot. Cover the Chicken with water and add half of the lemon to the water, as well as a few stalks of parsley. Turn the heat to medium-high and bring the water to a simmer. Once simmering, reduce heat to medium and continue cooking for 10 to 15 minutes, or until chicken reaches 165 degrees. Remove Chicken from the water and place onto a plate in the refrigerator to cool.
  2. While the chicken is cooking and cooling, we will prepare the vegetables. Start by cutting the Celery into thinner sticks, then dicing into small pieces and add them to a mixing bowl.
  3. Remove a small handful of tops from the Parsley and give it a rough chop, then add 3 Tbsp to the bowl.
  4. If you purchased whole Almonds, carefully chop them into ½ cup of finer pieces with your knife, or mash them with a bowl. You can also pulse them in a food processor if you wish. If you purchased already chopped Almonds, simply add ½ cup to the bowl.
  5. Add ½ cup of Whole Grapes to the bowl as well. If you wish to cut them in half instead, feel free. I prefer the “pop” of Whole Grapes in my Chicken Salad, but the choice is yours.
  6. Slice ¼ cup of Green Onions by starting at the green end and making very thin slices until your reach the thick white end. Discard the white ends and add the sliced Green Onions to the bowl.
  7. Add ¼ cup Greek Yogurt, 2 Tbsp Avocado Mayo, and 1 tsp of Dijon to the bowl.
  8. At this point, the Chicken should be cooled. Dice the Chicken into ¼ inch chunks and add them to the bowl.
  9. Squeeze the other half of the Lemon into a smaller bowl, remove any seeds that may have fallen in and add the juice to the salad bowl. Then season everything with a pinch of Salt and Pepper.
  10. Use a rubber spatula or spoon to mix everything together, making sure to incorporate all of the “saucy” ingredients as well. Once you have everything evenly distributed and mixed together, you can eat it as is, or add it to salads, sandwiches, or wraps! Keep in mind, the Nutrition Facts only cover this recipe, so be sure to account for any added ingredients like bread or tortillas. Enjoy!

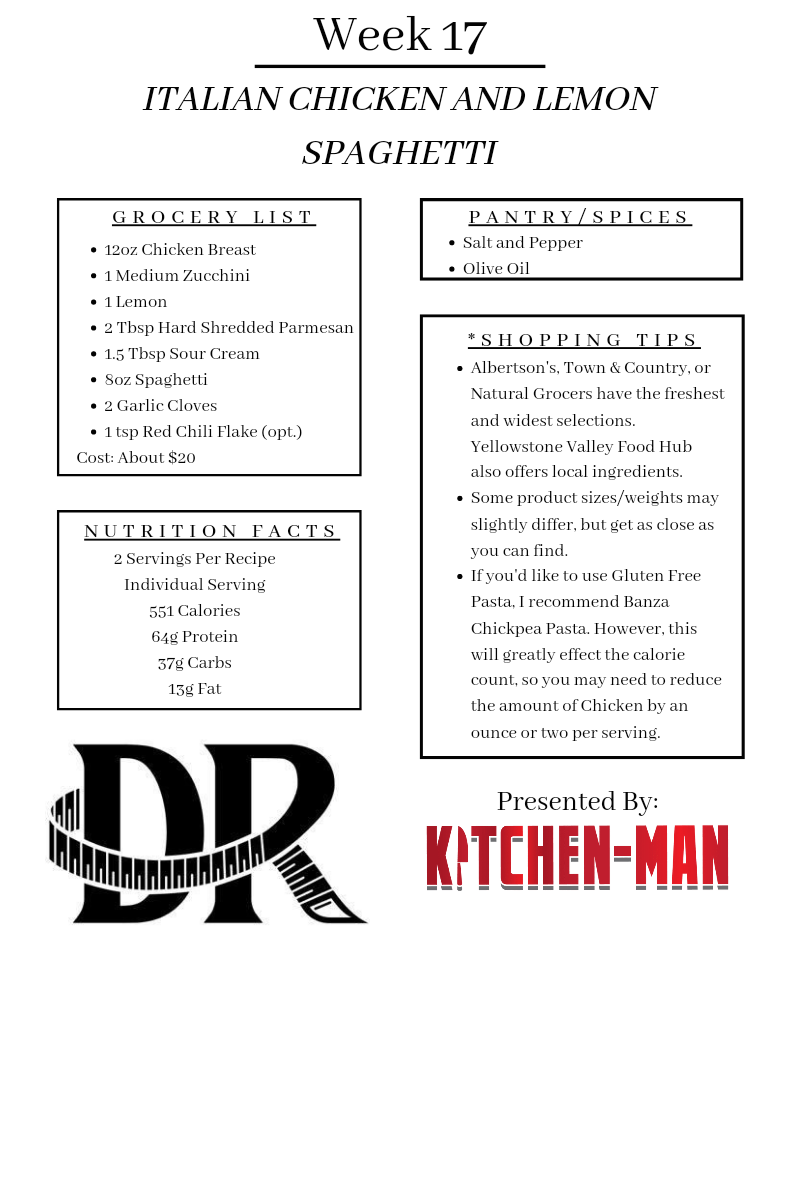
Chef Jeremy's Italian Chicken and Lemony Spaghetti

weight loss chef diet doctor clinic health recipe medical last diet Billings montana

Italian Chicken and Lemony Spaghetti

12oz                Chicken Breast (1 large breast cut in half or 2 smaller breasts)

8oz                  Spaghetti

1 Medium       Zucchini

1 ea                 Lemon

2 Tbsp             Hard Shredded Parmesan Cheese

1.5 Tbsp          Sour Cream

2ea                  Garlic Cloves

1 tsp                Red Chili Flakes (opt)

2 tsp                Italian Seasoning (opt)

  1. Preheat oven to 400 degrees, then bring a pot of water to a boil. Add the Spaghetti to the boiling water and cook for 8 minutes or until done to your liking.
  2. While the pasta cooks, mince the Garlic and place into a small bowl. Add the Parmesan to the bowl of Garlic, then add 1 tsp of chili flakes and 2 tsp of Italian Seasoning, if you wish to do so. If you do not enjoy the spice or flavor, you can leave out the seasonings without changing the nutritional value. Toss the Garlic, Parmesan, and Seasonings together until evenly mixed.
  3. Cut Chicken into 2 equal 6oz portions, or as close as possible depending on the size of the breasts. Dry the chicken with a paper towel, removing all excess chicken juice. Lay the chicken onto a foil lined sheet pan, and add a pinch of salt to each breast. Spread about ½ Tbsp of Sour Cream over the top of the Chicken Breasts, then cover the top of the Chicken with the Garlic Parmesan mixture and firmly pat it onto the Chicken so it sticks to the top.
  4. Place the pan of Chicken in the oven and bake for 14-16 minutes or until Chicken reaches an internal temperature of 165 degrees.
  5. While the Chicken is cooking, cut the Zucchini in half lengthwise, then into ½ inch thick semi-circles. Toss the cut Zucchini in 1 tsp Olive Oil and a pinch of salt. You may leave out the oil if you’d like. Heat a Sauté pan over medium high heat, then add the Zucchini and cook until lightly seared and caramelized. This should take about 5 minutes.
  6. While the Zucchini is searing, strain the pasta if you haven’t already, then return it to the pot off of the heat. Squeeze half of the Lemon over the pasta and mix it in.
  7. Once the Chicken is finished, add half of the pasta to each plate, place some Zucchini on top of the pasta, then top with the Chicken Breasts. Squeeze the other half of the Lemon over each plate and enjoy!

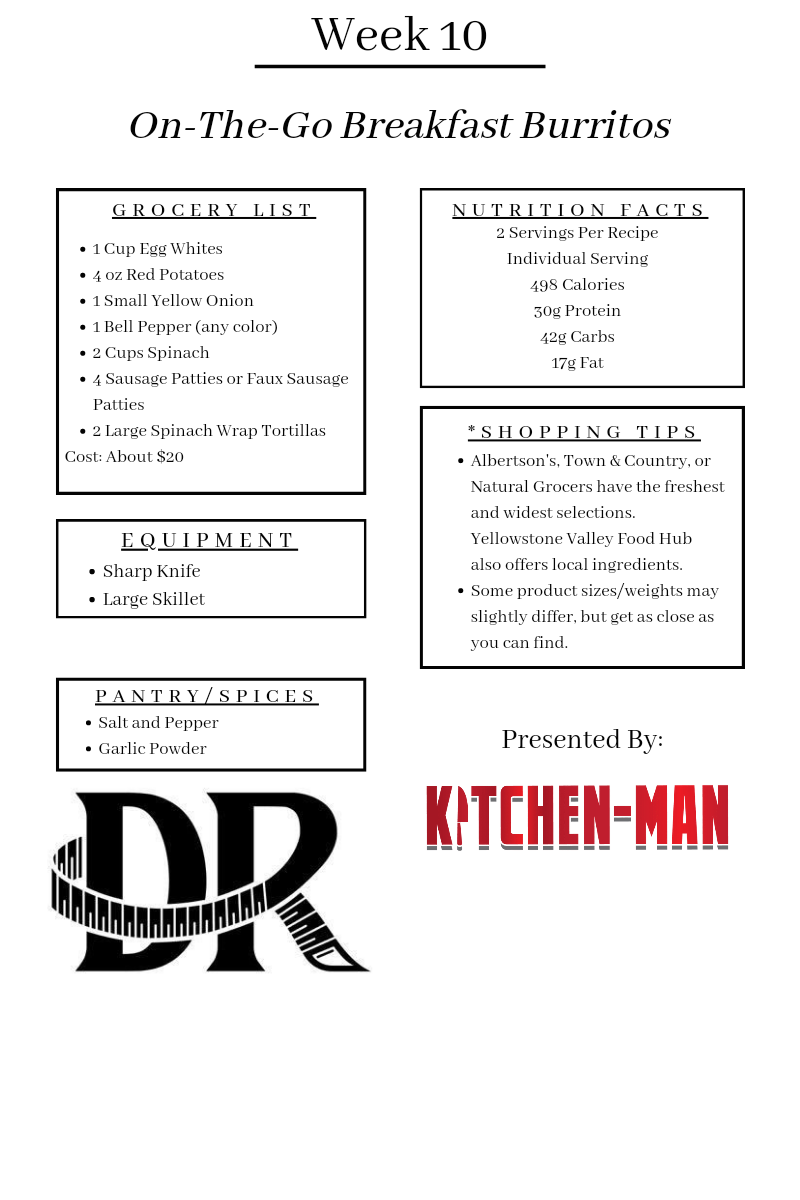
Chef Jeremy's On the Go Breakfast Burritos

On The Go Breakfast Burritos

3 each             Red Potatoes, small diceBurrito Recipe CArd

1 each             Bell Pepper (any color), small dice

1 each             Yellow Onion, small dice

2 Cups             Spinach

4 each             Sausage Patties or Faux Sausage Patties

1 Cup               Egg Whites

1 tsp                Olive Oil

½ tsp               Salt

¼ tsp                Black Pepper

½ tsp               Garlic Powder

  1. Cut potatoes into ¼ inch circles, then cut them into ¼ inch cubes. Heat a pan with 1 teaspoon of Olive Oil over medium heat and add the diced potatoes to the pan. Stir them around to make sure they get coated in a thin layer of oil to prevent burning. Cover the pan with a lid to create steam and continue cooking the potatoes while you prepare the other ingredients.
  2. Dice the onion by removing both ends, then slicing it in half through the root ends. Cut the onion into ¼ inch slices, then rotate the onion and slice the other way to create ¼ inch dices. Add them to the pan and cook with the potatoes.
  3. Cut the Bell Pepper by removing the top. Pull out the center seeds with your fingers, then remove as much of the white pith as you can. Turn the Pepper upside down over the garbage and lightly tap the bottom to knock any extra seeds loose. Cut the pepper in half through the bottom, then cut it into ¼ inch slices. Dice the slices into ¼ inch pieces and add them to the pan.
  4. Add Sausage Patties to the pan and break them into smaller chunks as they cook. Faux Sausage is usually already pre-cooked, so you’ll only need to heat them until they are hot enough to eat. Raw Sausage Patties will need to be cooked until fully browned.
  5. Add the Spinach to the pan and cook until wilted.
  6. Turn heat to medium-low then add the Egg Whites. If you are using whole eggs, separate the yolk from the whites by cracking 6 eggs into a bowl, then gently scooping the yolks out with your loosely cupped hand or half of an eggshell. You can also use liquid egg whites in a carton if you are going for simplicity. Season with Salt, Pepper, and Garlic Powder.
  7. Once the Egg Whites are in the pan, let them cook for about 20 seconds before stirring. This will help you get nice chunks of Egg instead of little pieces. You can also cook the eggs separately in another pan if your wish.
  8. Heat a tortilla in the microwave for 10-15 seconds to get it moist and warm. Add about 1/3 of the burrito filling into the tortilla right in the center. Fold the sides into the middle nice and tight against the filling, the fold the bottom flap all the way over the filling, tight once again, then roll it the rest of the way, tucking in any extra flaps as you roll. Now you’re ready to enjoy, or wrap it in tin foil and freeze until your ready to eat again!
  9. To reheat, place in the oven at 400 for 10-15 minutes or until warm in the middle. You can also microwave it instead, but be sure to remove it from the tin foil first.

Chef Jeremy's Protein Packed Mac (and Cheese)

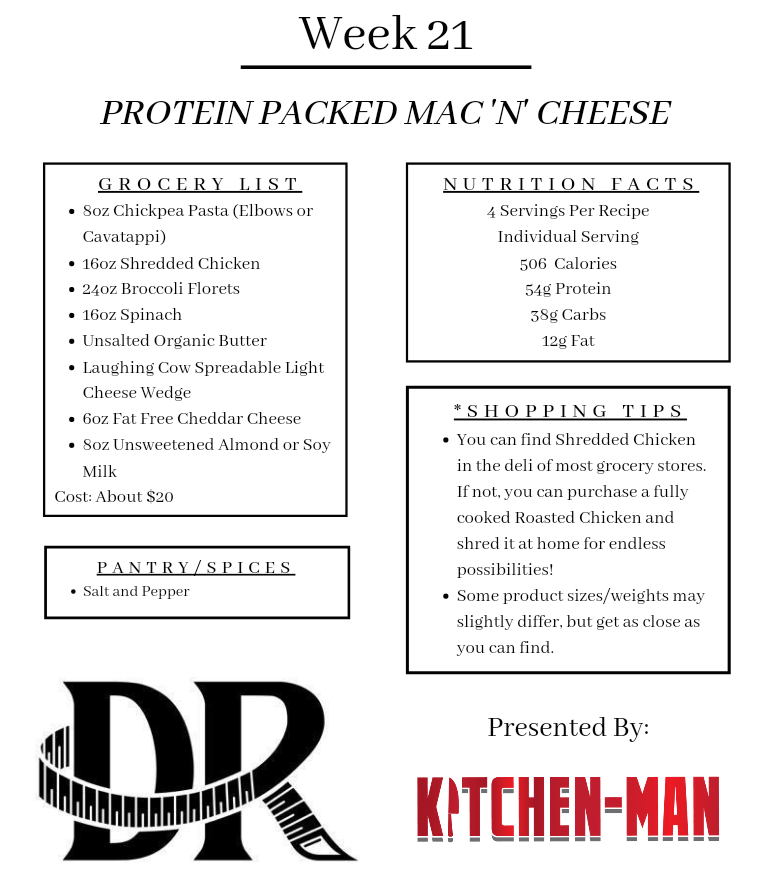
Protein Packed Mac ‘N’ Cheese

(And yes, it really is this good for you!)montana weight loss diet clinic doctor

8 oz                 Chickpea Elbows or Cavatappi Pasta

4 Cups Chopped Broccoli Florets

2 Cups Chopped Spinach

1 ½ oz              Laughing Cow Light Cheese (2 small wedges)

1 ½ Cups          Fat Free Cheddar Cheese

1 Cup               Unsweetened Almond Milk or Soy Milk

1 Tbsp Unsalted Organic Butter

16 oz               Shredded Chicken      

  1. Start by bringing a large pot of water to a boil over high heat. While water is heating up, remove any large stems from the Broccoli and trim any large florets so they are all about the same size, and set them aside for now. You can also chop the Spinach at this stage and set aside until near the end.
  2. Once water is boiling, add the Chickpea Pasta and set a timer for 8 minutes. Slowly stir the pasta for the first 30 seconds to prevent it from sticking to the bottom. After 4 minutes, add the Broccoli to the pot with the pasta, then continue cooking for the remaining 4 minutes. Check the pasta for doneness to your preference then pour Broccoli and Pasta into a strainer.
  3. Using the same pot, over medium-low heat, add the Butter, Almond Milk, and a pinch of Salt and Pepper. Once Butter is melted, add the Pasta, Broccoli, 2 Cheese Wedges, and Shredded Cheese, then stir until the Cheese begins to melt.
  4. Once, the Cheese is nice and melty add the Spinach and stir until it begins to wilt. At this point, you can either add the Shredded Chicken directly to the pot and mix it in, or you can choose to top each bowl instead.
  5. Divide the finished Mac ‘N’ Cheese into 4 bowls, then top each with 4oz of Chicken, if you did not add it to the pot. At only 506 Calories, you have a little wiggle room to garnish your dish with things like Fresh Parsley, Parmesan, or even some Breadcrumbs! Just make sure not to go overboard with the toppings and enjoy!

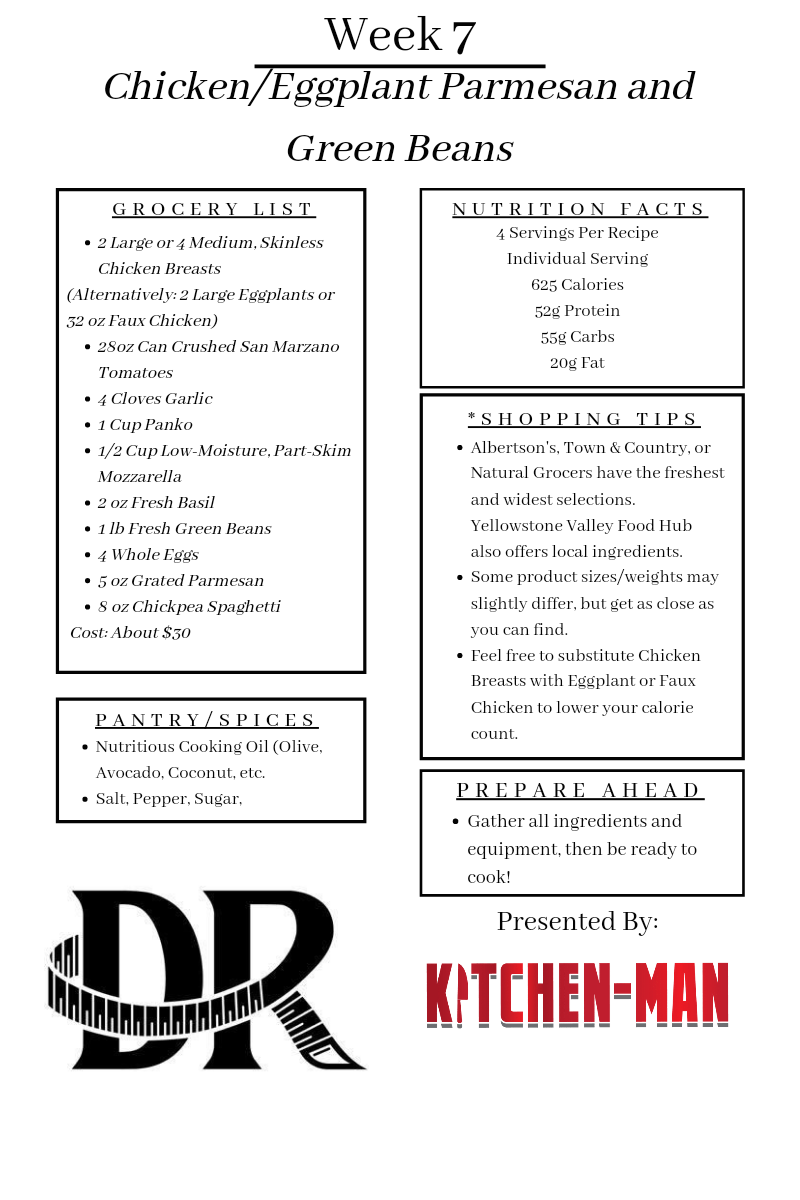
Chicken or Eggplant Parmesan with Green Beans

Chicken Parm with Green Beans

Chicken/Eggplant Parmesan w/ Green Beans

Breaded Chicken/Eggplant

2 Large Chicken Breasts (or 2 Eggplants, or 32oz Faux Vegan Chicken)

1 Cup Panko Breadcrumbs

¼ Cup Grated Parmesan

1 tsp Salt

4 Whole Eggs

2 Tbsp Water

  1. Preheat oven to 450 degrees. If using Chicken Breasts, start by slicing them in half so that they are thinner but still retain their whole breast shape. For Eggplants, remove the top stem, then cut them lengthwise into 1-inch thick slices, then lightly score them by gently slicing diagonally down one side of the “meaty” inside part. For Faux Chicken, it will most likely come in chunks or pieces, so no cutting should be necessary. To save words on the page, I will just say Chicken, but the steps remain the same for Eggplant and Faux Chicken.
  1. Crack 4 eggs into a medium mixing bowl, then add 2 Tbsp of water and whisk with a fork until evenly combined. Set aside. Add 1 cup of Panko, ¼ cup of parmesan, and 1 tsp of salt to another bowl and stir until combined. Set aside.
  1. Dip the Chicken into the egg mixture on both sides and coat evenly. Shake off any excess egg, then dip them into the Panko mix and coat evenly. Lay the coated Chicken into a medium or large, lightly oiled baking dish. Once all Chicken is in the pan and oven has reached 450 degrees, place the pan of Chicken in the oven and set a timer for 15 minutes. We’ll check our Chicken to make sure it isn’t burning, then continue baking for another 10 minutes.

Marinara

28 oz Can of San Marzano Crushed Tomatoes

4 Cloves Garlic

1 Tbsp Olive Oil

1 tsp Salt

1 tsp Sugar

¼ tsp Black Pepper

  1. While the Chicken in cooking, we will make the marinara sauce. Start by roughly chopping the Garlic. Add 1 Tbsp of Olive Oil to a medium sauce pot and turn heat to medium. Once Oil is hot, add Garlic and cook for about 1 minute or until fragrant.
  2. Add the can of Tomatoes, Salt, Sugar, and Pepper to the pot, and stir. Cook over medium-high heat until it begins to simmer, then turn heat to low. We’ll come back to this once our Chicken is almost done.

Chickpea Pasta

  1. Add about 10 cups of water to a medium/large pot and bring to a boil over high heat. Once boiling, reduce heat to medium-high, add your Pasta and cook until soft. It should take about 5-7 minutes. Keep an eye on it to make sure it doesn’t boil over.
  2. Once fully cooked, strain off water and set aside.

Green Beans

  1. Simply rinse your Green Beans under cool water, then place them onto a sheet pan and place them into the oven on a separate rack from your Chicken. These will only take about 8-10 minutes to cook. Season to your preference afterwards, if you wish.

Finishing Touches

  1. By this point, your chicken should be just about done and the marinara should be hot. Remove the pan of Chicken from the oven, then ladle some marinara over the top of each breast. Sprinkle a few pinches of Mozzarella over the marinara and return the pan to the oven for 2 or 3 minutes to melt the cheese.
  2. While the cheese is melting, get 7 or 8 Basil leaves, lay them on top of each other, roll them up into a tube shape, then thinly slice, or cheffonade.
  3. Remove the Chicken and Green beans from the oven. Add about ½ C of Spaghetti to each of your plates. Top the Spaghetti with one of the sauce covered Chicken breasts. Add Some Green Beans to each plate. Finally, garnish your Chicken Parm with the fresh Basil, serve up the family, and enjoy!

Collagen - Does It Work?

When I founded Discreet Reductions I made a promise to myself and to my patients – I would never sell, recommend or require any supplements that I did not 100% believe in.There are so many companies out there that take advantage of people when they’re vulnerable. With Discreet Reductions, I made a vow to never do that to my patients.

My vitamin supplier of choice, as many of you know, is Celebrate. They send all their products to independent, 3rd party verification services who certify that their products contain what they say they do, and in the quantities advertised. They also follow science, data and guideline recommendations when they formulate their products to make sure they’re not only safe, but effective. When Celebrate emailed me to let me know they were now offering collagen peptides, I was skeptical to say the least. I had never looked at the actual scientific evidence behind collagen before, but since I trust Celebrate I figured it was worth a look.

And I was shocked.

First – what is collagen? Simply put, collagen is a type of protein. One of the basic building blocks of life. You think about Whey protein, egg protein, milk protein, soy protein, and so many others. You can add collagen to that list. Collagen protein however is unique – it does not contain all of the essential amino acids. This means you could not live only eating collagen protein, nor could you build muscle. So don’t think of collagen as a protein replacement, but rather it’s another type of protein you can utilize as part of your healthy diet.

Due to collagens unique nature in the protein spectrum, it has some interesting properties. Unlike traditional protein, companies claim collagen can help reduce wrinkles, plump skin and even tackle cellulite. People go as far at using collagen injections under wrinkles to help reduce fine lines and plump their skin. This means there’s money to be made off collagen, and this leads to a lot of false claims and empty promises.

Let’s look at some of the promises made by collagen companies, and then look at what the literature says. Keep in mind that not all collagen is created equal. Collagen is a protein, and like everything in life has a weight associated with it. Some are heavier than others, and they’re all slightly different. Think of it like a zucchini – if you go to the store and buy a 0.5lb zucchini and a 3.5lb zucchini they’re going to taste very, very different. Celebrate uses type I and type III bovine collagen, so we will focus on that. You’ll have to trust me when I tell you the science behind this is incredibly complex, so we will keep this a simple overview.

Claim: Oral collagen supplements reduce joint pain – FACT.There is a study looking at 180 patients who used Type I collagen peptide supplementation. They all had knee discomfort at baseline after squatting. They then took 5 grams of collagen for 12 weeks, and their pain was reassessed at the end of this period. They found that there was a statistically significant reduction in knee pain in the collagen treatment group after 12 weeks. There was then another study done with 13 weeks of supplementation that found the same benefit in the collagen use group.

Claim – Collagen promotes skin health, elasticity and hydration – FACT.In February of this year, a group of researchers analyzed 12 studies that all looked at whether collagen had a beneficial effect on skin health. Across these 12 studies, both type I and type III collagen were assessed. After pooling the results of all 12 studies, the researchers determined that collagen did in fact have a beneficial effect on skin moisture, hydration and elasticity. This led to healthier, tighter appearing skin in the study participants. The researchers note that regardless of whether type I, type III, or both types of collagen were used the results were still beneficial.

Claim – Collagen can help brittle nails by strengthening the nail and promoting nail growth – FACT.There are several small studies that confirm this, but they were all funded by the company that made the collagen used in the study. This means that while the results are positive, they are at risk for being biased. However, their findings do support using a collagen supplement directed at hair, skin and nail health. They found that over 4 weeks of taking collagen, their study participants saw a 12% increase in nail growth rate, a 42% decrease in broken nails and 80% of the study participants said they felt the collagen positively impacted their nail health.

Based on the evidence I can find, I feel comfortable recommending Celebrate’s collagen supplements to my patients. I recommend their Collagen Peptide for skin, nail and joint health. Given the overall positive results of numerous studies out there, it does not seem that you need to take a collagen supplement specifically formulated for one goal, such as joint health or skin health. Rather, it appears that type I and type III collagen are uniformly beneficial for skin, joints and nails. And it gives you an extra dose of protein for your day, which will help promote lean muscle growth and is a beneficial part of any weight loss plan.

You can buy our recommended collagen (and other Celebrate products) on our website HERE. And if you're an Active Patient in our practice, remember you get discounts every day at our Patient Pricing Protein Store.

If you have any questions about collagen, or if you would like to read the studies I reference above, please email me atThis email address is being protected from spambots. You need JavaScript enabled to view it..

Day of Rest

Day of Rest

Sometimes we all need a reminder that our bodies are not machines.  I’m as guilty as anyone of this.  For many years now, I’ve fallen into the trap thinking that since I eat well, workout daily and generally take good care of myself that my body doesn’t need rest from my routine.  Funny enough, it does. And as you know, your body (and mine) has a way of reminding you to take a break when you most need it. 

For the last several months I’ve been super busy trying to get several projects off the ground.  Simultaneously, I’ve also been struggling with a nagging plantar fasciitis in my right foot.  Initially, it wasn’t so bad.  Just a small irritation when I stood up in the morning or after I got off the treadmill.  I thought “Oh, I must have just aggravated it doing something.  It will go away.”  No big deal.  My body’s warning went unheeded.  Over the next few weeks, it became a bit more noticeable, but still nothing to write home about.  Just a persistent irritation when walking around and worse after a run.  However, I was too busy to worry about it anyway.  My work and travel schedule were running at full steam and sneaking in those morning runs before the day got going was far too important.  My body’s warning bells were ignored once again.  Fast forward another few weeks and the recipe for disaster was suddenly cooking away with high stress, less sleep and more denial about what was really going on here.  Now I was having pain with every step, throbbing aches in my foot that would wake me up at night and a newfound desire to wear heals to ease the pressure off my foot during the day.  Stubbornly, I shut off my body’s dire warnings with ibuprofen and Voltaren gel so that I could keep on getting my workouts in.  

It wasn’t until I limped into Starbucks (for my 3rd coffee of the day) that I had the “A-ha” moment.  When getting out of the car, the parking spot seemed miles away from the store and I dreaded putting my foot down on the ground for the first time in a while since riding around in the car all day.  But dang it, I needed the pick me up!  I was tired!  As I started to limp in toward the store, I had the realization that maybe I was pushing a wee bit too hard… I certainly had been running on a lot less sleep than I liked.  I wasn’t eating as well being so busy and traveling frequently.  Plus, in an effort to keep working toward some of my goals, I had been pushing hard in workouts despite being chronically tired over the past two months. 

Sometimes what the body really needs is rest…real rest!  This means going to bed early and sleeping late until you’re (at least mostly) caught up on sleep.  This means eating really clean and going for wholesome foods with lots of fruits and vegetables to up your antioxidants and decrease your inflammation.  This also means taking a break from your normal workout routine and considering some active rest like gentle stretching, yoga, hikes, walks or breathing exercises.   For me it has meant all those things as well as some meditation and some ice baths for my poor foot. 

Our bodies were not meant to tolerate the near constant stress we put them under.  Our modern society rarely allows us time to rest and regenerate.  Workdays are now longer than ever, weekends and evenings are no longer sacred, and globalization means time zones are now blurred to stay ahead of the competition.  Between calls, texts, emails, social media and other forms of technology, we are constantly connected to our own worries/stresses as well as the worries and concerns of others.  While wonderful and amazing, we rarely stop to consider the impact of modern technology and lifestyle on the human body that evolved for a much slower pace.  Considering the skyrocketing rates of anxiety, depression and other stress related illnesses, it’s becoming even more critical to learn how and when to rest.  Listening to our bodies is a huge start.  Have you ever woken up in the morning and felt exhausted before your feet even hit the ground?.. That might be indicator #1.  Need 2 or 3 cups of coffee just to get going?.. Indicator #2.  Snap angrily at your kids or spouse for no reason?..  Overwhelmed with just the thought of going to work?.. Have a nagging injury that just won’t go away?.. Chronic headaches or migraines?.. Acne or breakouts?... Frequently sick with colds and coughs?.. Yup, these are just some of the ways the body attempts to tell us that we need more rest. 

So here are some thoughts on how we can achieve a better balance (from a person that is still working on this whole resting thing 😉). First, identify your body’s alarm system.  Mine is injury.  After spending almost, a full year in a cast during medical school for a fracture that just wouldn’t heal, I learned that prolonged, highly stressful situations cause me injury.  I’ve been through enough injuries now that any failure to acknowledge that fact is mostly willful ignorance on my part (see description of plantar fasciitis above). 

Second, figure out what is stressing you.  Once I thought about it, I realized that several of my projects had unintentionally come to fruition at almost the same time.  Had I planned better, it would have been easy to predict the overwhelming nature of doing 10 things at once. 

Third, mitigate the damage as best you can.  In this scenario, it meant doing a few things.  I looked at my calendar over the upcoming months and prioritized my activities.  I made a list and then color coded them red, orange and yellow.  I then tried to reschedule any yellow events or plans since they were not as high on the list.  As a person who thinks she can do everything all at once, this hurt my heart more than you know.   However, to get and stay healthy, it had to be done!  Plus, I know that I’ll enjoy those events more when I do eventually get to them if I’m not trying to bust through them with my hair on fire. 

Finally, actually rest.  Take a beat, take a breath and be willing to prioritize YOU for a couple of days.  Rest isn’t just important, it’s critical to keeping us healthy and moving forward towards our goals.  Mental and physical rest needs to be scheduled into our lives, just like our workouts, meetings, work events, etc.  So many times, I see patients who put their children’s and family’s wants and activities before their much needed self-care time.  Remember, self-care isn’t selfish, it's good medicine! 

For the Love of a Farmer's Market

For the Love of the Farmer’s Market

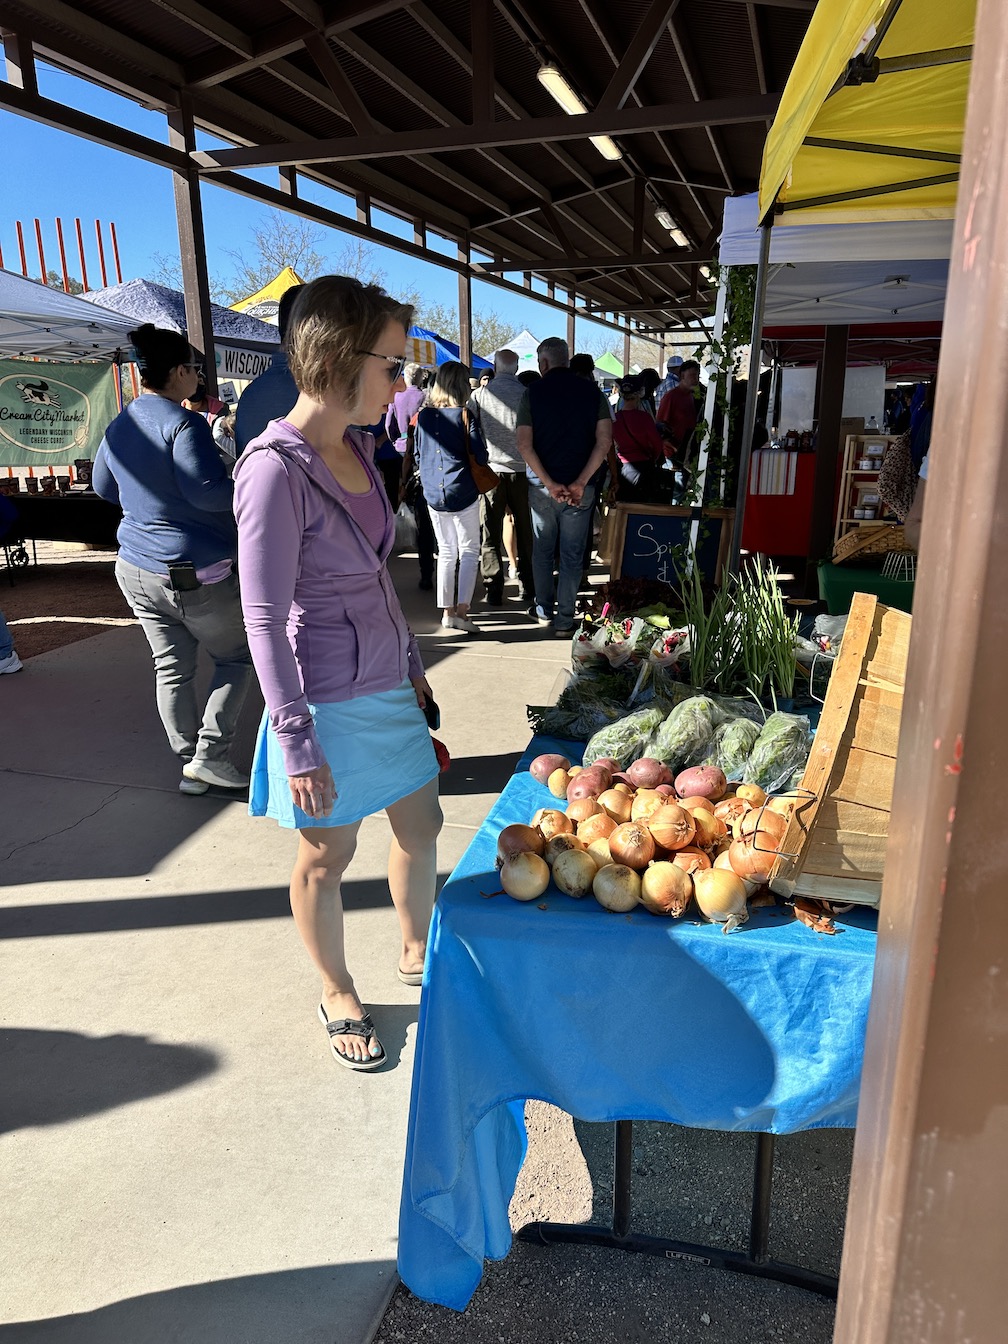
I love farmer’s markets!  Really, I love them!! To the point that my husband doesn’t want to accompany me because I could spend all day meandering around the stalls of fresh fruits and vegetables – sniffing, squeezing, weighing and discussing each individual potentially delectable treat all day. 

During a recent trip to Tucson, I apparently found the mecca of farmer’s markets.  Tucson has, quite literally, a different market almost every day of the week.  Over the course of the weekend, I went several days in a row and was not disappointed.  Each day, there were some of the same stands but always several new ones with different things to try.

For those who have never been to a real farmer’s market, let me give you the lay of the land.  The original intent of the market was to put the producer (farmer, baker, fisher, etc.) in direct contact with the consumer (usually me) so that both the price and the quality for fresh produce and goods is better than in the supermarket.  The producers make more off their products and the customer gets the freshest possible options.  The most common products are fruits and vegetables, jams, honey, jerky, bread or baked goods, meat, cheese and dairy, eggs, and sometimes fish.  At most farmer’s markets, there are also many vendors selling handcrafted goods such as pottery, paintings, photographs, carvings, etc.  Previously, farmer’s markets were the way to grab produce at the cheapest cost while still paying the farmer a fair wage.  However, more recently farmer’s markets have been so popular that some farmers will charge top dollar – even more than they charge normally.

My experience in Tucson was among the best I’ve ever had.  The prices for organically grown vegetables were INCREDIBLY low, including $2/pound of organic brussels sprouts and carrots.  Local honey was $8/pound.  There were tons of leafy green options such as lettuces, kale, chard, and sprouts that were all very reasonable.  When it came to dairy, meat and seafood, the prices were a bit higher, but all comparable to any local grocery store.  There were also SO many new things to try – limequats, Mizuna, and pomelos were just some of the things I found along with some random citrus hybrids (tangerines crossed with an orange was a delicious one).  Each farm had their own assortment of heirloom vegetables as well based on the individual farmer’s preferences and what sells well.

This brings up one of the best parts of a farmer’s market – the ability to support a local farmer.  Farmers work exceptionally hard and are the backbone of our country, growing the food that feeds millions of people, cattle, poultry, etc. each year.  Unfortunately, economic pressures are driving many farmers out of business and/or to monoculture crops that rely heavily on pesticide use.  Smaller, biodiverse, sustainably, and organically grown farms are finding it harder to harder to stay in business, hence the higher prices at the farmer’s market.   Choosing to support local growers is a huge step each of us can take toward keeping our local farmers in business and practicing responsible growing practices.

At the Tucson markets, you can look for the “Get Real” certification flags at the vendor’s booths to tell you who is local and who isn’t.  Unfortunately, there have been some well publicized cases in both the USA and Canada of people presenting their store-bought produce as home grown at farmer’s markets to make more money rather than doing the hard labor of growing it on their own.    CBC Canada did an expose on this a few years ago (https://www.cbc.ca/news/business/farmers-markets-lies-marketplace-1.4306231) and other news agencies like NPR and the LA Times have reported on it as well.  (https://www.npr.org/sections/thesalt/2014/10/02/352979875/california-cracks-down-on-farmers-market-cheaters)

https://www.latimes.com/food/dailydish/la-dd-here-are-five-tipoffs-that-can-help-you-avoid-farmers-market-cheaters-20131227-story.html

However, back in Montana, it’s a bit easier to figure out who the local growers are.  A quick google search and a short (<2 hour) drive will get you to the farm if you were so inclined.  The Yellowstone Valley Food Hub has made it even easier though.  If you haven’t heard of them, they are a grower’s cooperative serving central and eastern Montana with over 35 producers from across Montana and Wyoming.  I have no financial interest in this group, except that I purchase fresh produce and dairy from them all year long (with summer being by far the best time to buy!).  I love being able to support local farmers and get the freshest, top-quality products that Montana has to offer.  During the summer, it’s essentially like going to the farmer’s market except that I go online to order and pick up my bag of groceries on Thursday evening on my way home from work.  I usually place my order on the weekend, that way I can plan my meals for the week.  You can also adjust your order up until 2 days prior.  Finally, I like being able to research each farm/producer ahead of time to know their location, organic vs. sustainable vs. conventional, etc.  If you have a question, you can even send them an email and you’ll generally get a response in a few days.  If you haven’t already, I highly recommend you check them out: https://www.yvfoodhub.com/.  You also have the option of going to the farmer’s market in the summer to pick your own produce.  The Yellowstone Valley Farmer’s Market (http://www.yvfm.org/) is open on the weekends downtown from July through October and the Gardners’ Market (https://www.healthybydesignyellowstone.org/what-we-do/current-initiatives/gardeners-market/) is open Thursday evenings June through October in South Park.  Look for the “Made in Montana” or “Grown in Montana” stickers to ensure your products are local through the MT Department of Commerce program (https://www.madeinmontanausa.com/). 

So why the long discussion on farmer’s markets?  Because a large part of being healthy means making daily food choices that feed our bodies the best quality food we can afford.  Fresh fruits and vegetables picked the same day or the day before are going to be a much better source of vitamins and minerals than those in the grocery store that were picked unripe and packed on trucks and transported hundreds of miles to sit on grocery store shelves for several days.  Buying local also means the possibility of more heirloom and organic vegetables rather than conventionally grown or genetically modified produce that were engineered for shelf life rather than flavor.  Better flavor means we’re more likely to eat more of the good stuff – vitamins, minerals, water and fiber!  The same goes for meat, dairy, eggs, honey and other products.  Did you know that pasture raised chickens produced eggs with over twice as much Vitamin E and omega 3 fatty acids than caged chicken produced eggs?   Pasture raised chicken eggs also have a significantly improved ratio of omega 3 (good) to omega 6 (bad) fatty acids.  Plus, amid “Eggflation” I’ve found the prices to be the same, if not better, than the grocery store lately.  Eating local is better for our bodies, our farmers, and our purses so before you head to the grocery store, explore some options and consider purchasing a part or all of your groceries through local channels. 


physician led weight loss doctor diet clinic

Game Changer (Intermittent Fasting)

Game Changer

People often ask me what is different about my program than other “diet” programs.  Why will my program work when all others have failed them?  What special food do I use, what magic pill do I prescribe, what cleanses, shakes or juices do I have that will do the trick? 

The answer is complicated because humans are complicated.  Any program that offers a simple solution is probably not all it promises to be, except if that promise is a box of food and an empty wallet.  What I offer is a solid understanding of human physiology and how to use your body’s normal responses to get to your desired outcome: weight loss. 

This is different for every person and there are so many variables (food, medicines, exercises, hormones, etc.), but a simple example is using intermittent fasting to specifically reduce insulin levels which improves weight loss. 

Intermittent fasting has been used for centuries by many different cultures for health and religious reasons.  It simply refers to a time where a person abstains from eating.  In the Muslim religion, Ramadan is a good example.  During the time of Ramadan (April in 2022), Muslims do not eat from the hours of sunup to sundown.  In the U.S., intermittent fasting is often used for health purposes with common periods of fasting lasting 16 to 24 hours. 

How does it work?  Each time we eat, we cause our insulin levels to go up.  How high and how fast the insulin spikes are dependent on the food we eat.  A loaf of bread will cause insulin to go up faster and higher than an apple.  Insulin is the fat storing hormone in the body.  It allows our body to bring glucose from the bloodstream into the cells and store the extra calories (energy) as fat in our cells.  We would die without insulin.  It is what allows us to store energy (fat) for use in times of famine or starvation. 

However, insulin also has a secondary effect.  When insulin levels are elevated, it does not allow us to access our fat stores for energy.  Insulin is focused solely on storage of energy.  Most of the time this would be fine as usually when your insulin levels are high you have just eaten and have plenty of energy from the calories you just ate.  However, we are now finding significant numbers of people who are insulin resistant and have elevated levels of insulin all the time.  This means they cannot access their fat stores for energy, making it hard, if not impossible to lose weight. 

Correctly identifying and treating people with insulin resistance is crucial to their success in weight loss.  Many of these patients have diabetes and pre-diabetes, however a portion do not and only show elevated insulin levels or blood sugars that easily rise and fall.  By running the appropriate tests and determining a patient’s insulin sensitivity, I can make recommendations that will drastically improve their likelihood of long-term successful weight loss. 

One dietary treatment is intermittent fasting.   Intermittent fasting allows insulin levels in the blood to fall and the body to access fat stores for energy.  The longer the time in the fasting phase, the longer the body has access to fat storage.  This not only leads to weight loss but improves the body’s sensitivity to insulin when it is present, reducing patients’ Hemoglobin A1C’s (average blood sugars over 3 months).  Intermittent fasting can even help prevent diabetes. 

When I talk with patients about intermittent fasting, I help them understand that there are many ways to go about their fasting periods.  Many are worried about being hungry or “starving” and certainly, that is NOT our goal.  In fact, diets that cause the body to go into “starvation mode” – such as many very low calorie, prepackaged fad diets cause the body’s metabolic rate to slow way down.  This is the opposite effect of what happens with intermittent fasting when properly done under a physician’s supervision.  Our goal is to increase your metabolic rate (burn more calories) while allowing your body to access your fat storage for the additional energy it needs.  No one needs to “starve” and there are many tools to help you achieve your goals such as proper meal timing, maintaining hydration and electrolyte levels and even foods such as FAST bars. 

Intermittent fasting isn’t for everyone, but it is one tool in a wide selection of helpful techniques known to physicians practicing medical weight loss.  So, when people ask how my program is different, my answer is that knowledge is the game changer.  Having a physician’s understanding of human pathophysiology and additional training in obesity medicine is the magic bullet.  After that, success involves just a tincture of time and a motivated patient.

Kat and Greg do Legs

Video Link: https://www.youtube.com/watch?v=SYporIiDYX4&ab_channel=DiscreetReductions

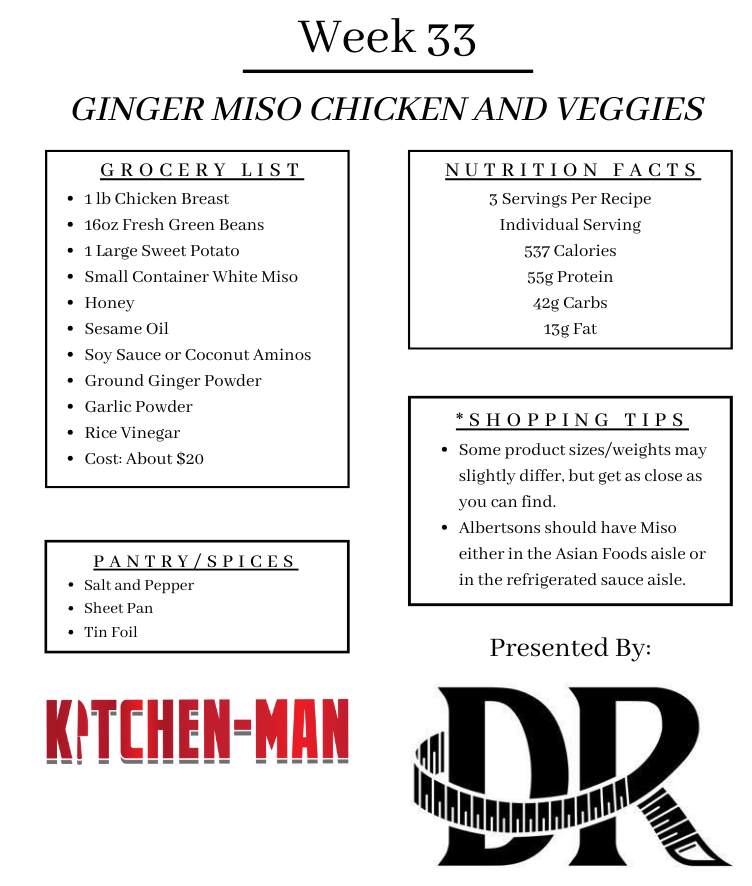
Lemon Herb Chicken with Greek Salad

Video Link: https://youtu.be/P9GMi4QdsJk

Lemon Herbed Chicken with Greek Salad

Lemon Herb Chicken with Greek Salad

Greek Salad:

  1. Start by rinsing all of your vegetables. Once rinsed, slice the Cherry Tomatoes in half lengthwise and place them into a mixing bowl. You’ll only need 10 or 15, so feel free to save the rest for a light snack later on.
  2. To cut the Cucumber, remove both ends, then cut into quarters lengthwise. Remove the seeds by laying the quartered wedges flat on one side and run your knife diagonally down the length of the seedy portion. Be sure not to remove too much of the “meaty” part of the Cucumber. Discard the seed sections, then dice the Cucumber wedges into ¼ inch chunks and add them to the bowl with the tomatoes.
  3. Remove both ends from your Shallot, then cut in half through the flat ends and peel of the skin. Lay either half of the Shallot flat and cut into very thin slices and add to the veggie bowl.
  4. Measure out ½ Cup of Pine Nuts and add to the bowl.
  5. Measure out 1 Cup of Low-Fat Feta Cheese and add to the bowl.
  6. Roughly chop 1 Tablespoon of Fresh Oregano and 1 Tablespoon of Fresh Dill and add to the bowl.
  7. Measure out 1 Tablespoon of Cider Vinegar, ½ teaspoon of salt, and ¼ teaspoon of Black Pepper, then add the to bowl.
  8. Take one Lemon and zest the peel over your bowl of veggies. Then cut the Lemon in half and squeeze one half of the juice into the bowl.
  9. Use a serving spoon to gently mix your veggies around so that they are evenly mixed and the “sauce” has covered everything. Set aside.

Seared Chicken:

  1. Preheat oven to 400 degrees and place a large baking dish or tray in the oven to get hot. It should be big enough to fit all your Chicken Breasts. Start by wrapping each breast in a paper towel to remove any excess liquid. Once dry, lightly season each with a pinch of Salt and Pepper.
  2. Roughly chop another tablespoon of each Dill and Oregano and place into a small dish. Rough chop 3 cloves of Garlic and add to the herbs. Zest the other Lemon into the herb dish and set aside. Cut the Lemon in half and set aside.
  3. Heat a large saute pan with 1 Tablespoon of Olive Oil over medium-high heat for about 1 minute. Once the pan is hot, add your Chicken Breast one at a time and make sure they have about an inch of space between them. Sprinkle some of the lemon herb and garlic mix on the uncooked side of the chicken and gently press it into the meat a bit. If your pan is too small, just sear one at a time and set them onto a plate once the first side of each one is seared. Once the first side of the Chicken has been seared, about 2 minutes, flip it and sear the other side for another 2 minutes or so. This will also gently cook the herbs and garlic to bring out the flavor.
  4. Once all your Chicken Breasts are seared, place them into the preheated baking dish, herb side up, and cook them in the oven until the internal temperature reaches 165 degrees. It should take 15-20 minutes, depending on thickness. (If you do not have a thermometer, you can cut into the middle of the thickest breast and check it internally. If you see any pink, it is not done. It should be white, but still a bit juicy.)
  5. Once fully cooked, remove Chicken Breasts from the pan and transfer to a plate or resting rack to cool.
  6. Once cooled, add about 1 ½ Cups of the Greek Salad mix to a plate of bowl. Slice your chicken into strips or chunks depending on your preference, and place them on top of the salad. Squeeze the remaining Lemon Wedge over the dish and enjoy!


Mushroom Tacos

MushroomTacos

Mushroom Tacos (4 servings)

14oz Impossible Sausage

16oz Chopped Mushrooms and Stems

1 Small Head Green or Purple Cabbage

1 Tbsp Peeled and Chopped Ginger

5 Cloves Chopped Garlic

1 C Water

½ C Sliced Green Onions

2 Tbsp Low-Sodium Soy Sauce

3 Tbsp Rice Vinegar

2 Tbsp Hoisin

1 Tbsp Coconut Oil

2 Tbsp Peanuts (garnish)

8 ea Cauliflower Torillas

  1. Before cooking, we will prep our vegetables. Start by washing and removing the stems of all Mushrooms and set them aside. Cut Mushrooms into ¼ inch slices. Then roughly chop the stems and combine them all into a bowl and set aside.
  2. Cut Cabbage by cutting in half from the stem down, then quarter. Remove Cabbage stems by slicing them off once the Cabbage has been quartered. Slice Cabbage into thin strips and add to the bowl of Mushrooms and set aside.
  3. Heat a large saute pan for 60 seconds over med-high heat and add 1 Tablespoon of Coconut Oil. Once hot, add the Impossible “Meat” and begin cooking and stirring every so often, until evenly browned.
  4. While “Meat” is cooking peel skin off of Ginger then roughly chop Ginger and Garlic, and thinly slice Green Onions. Add all to bowl of Mushrooms and Cabbage and set aside.
  5. Measure out 2 Tablespoons Soy Sauce, 3 Tablespoons Rice Vinegar, and 2 Tablespoons Hoisin and add all to a small bowl. Measure out 1 Cup of Water separately and set aside.
  6. Once Impossible Meat is cooked, add the bowl of vegetables and the 1 Cup of water to the pan, stir, and cover to steam. Don’t worry about the amount of food, it will shrink as it cooks.
  7. Once Mushrooms and Cabbage have wilted and shrunk, add the small bowl of liquid seasonings and reduce heat to medium leaving uncovered.
  8. Cook for about 5 minutes, then remove from heat.
  9. Warm 2 tortillas for each person either in the oven or the microwave, scoop about 1 Cup of the meat/veggie mix into each tortilla, then top with crushed Peanuts and leftover Green Onions. Enjoy!

One Skillet Lasagna

One skillet LasagnacardEating healhy doesn't mean you can't enjoy your favorites! This goes great with a little bread or soft pita chips.

1 lb                  Extra Lean Ground Beef (90% lean, 10% fat)(Alternatively, you can use 1 lb Impossible Beef or even Ground Turkey)

2 Medium       Zucchini

1 Small            Yellow Onion

5 ea                 Button or Crimini Mushrooms

4 ea                 Garlic Cloves

8 oz                 Fresh Spinach

24 oz               Organic Marinara

8-10 ea            Fresh Basil Leaves

1 Cup               Low-Fat Cottage Cheese (optional)

¼ Cup              Shredded Parmesan (optional)

  1. Start by cooking the Ground Beef in a large skillet until browned and all fat has been rendered out. Pour Beef into a strainer to drain any excess fat. Do not dump the fat into the sink, as it can clog your drain. Instead place a bowl under the strainer to catch the fat, then dump into the garbage once it has cooled. Save the meat in the strainer for now.
  2. Cut your Zucchini by slicing it in half lengthwise, then into ¼ inch half moons and discard the ends. Place Skillet back onto medium heat, add the Zucchini to the pan, and let it cook.
  3. Dice the Onion by removing the top, then cutting it in half through the bottom root. Lay one half of the Onion flat, then make ¼ inch wide cuts towards the root, but do not cut all the way through the root end. Then cut perpendicular to you first slices as close to the root as you can. Discard the root and add the diced Onions to the pan, then repeat with the other half of the onion.
  4. Remove the stems of the Mushrooms simply by pulling or cutting them off. Cut the top of the Mushroom into quarter inch slices, then roughly chop up the stems and add it all to your pan.
  5. Mince the Garlic by chopping them into very small pieces and add them to the pan.
  6. Roughly chop the Spinach by piling it up and cutting until they are about ½ inch pieces, then add them to the pan.
  7. Deglaze the pan by pouring in 3 Tablespoons of Balsamic Vinegar. Allow all your veggies to cook for 5 or 6 minutes to get rid of their excess moisture and absorb the Balsamic Vinegar flavor.
  8. Once all your veggies have become soft, pour in the Marinara sauce and stir to coat all the veggies, and bring to a simmer.
  9. Once the sauce begins to simmer, add the Ground Beef From earlier and continue cooking everything in the Marinara for 3 or 4 minutes. This will help the sauce thicken and absorb into all of the ingredients.
  10. While everything in the pan is cooking, pluck about 8 to 10 Basil Leaves and stack them on top of each other like a deck of cards. Roll them into a tube then slice down the tube of Basil until you have a small pile of Basil strips, then add them to the pan and stir it up. Cook for another 2 minutes or so to thicken the sauce to your desired consistency.
  11. At this point we will add our cheeses if you are choosing to use them. If not, reduce the heat to low and let it cook slowly. If you are adding cheese, spoon a few dollops of Cottage Cheese around the top of your Lasagna. Then sprinkle ¼ cup of Parmesan all around the top.
  12. If your pan is safe to put in the oven, place it on the bottom rack and set your broiler to the lowest setting. Close the oven and melt the cheese. Broilers can be tricky to gauge, so be sure to check on it every 30 seconds or so to make sure it doesn’t burn, but a little bit of browning and bubbling is ok. Remove from the oven once cheese is melted to your preference.
  13. If you do not feel comfortable placing your pan in the oven, you can also just place a lid on top of it and reduce the heat to low and allow the steam to melt your cheese.
  14. Once the cheese is melted, you can scoop yourself a serving of this tasty One Skillet Lasagna and garnish it with some leftover Basil or just eat it as is. There should be about 4 to 5 servings in this pan, depending on your appetite, so eating about ¼ of the pan will be between 450-550 calories. Enjoy!
© Discreet Reductions. All rights reserved.
Website by Metcalfe Media.