Beach Drinks that Won't Break Your Diet

Beach Drinks

I know, I know, it’s cold outside (mid-January in Billings, MT) but many people like myself like to get out of town this time of year and head to beaches with warm sand and cold drinks.  However, those beach drinks can pack a big punch in terms of calories and sugar making it easy to put on some extra pounds during vacation.  Never fear though, your goals are still very much within reach.  After many trials and errors, yours truly has learned how best to navigate the bar menu options at those all-inclusive resorts so that you don’t have to make the same mistakes.  Someone had to take one for the team, so here we go… ?

If you’re looking for something sweet and refreshing, skip the Margaritas and Mai Tais which have 300+ calories each and go for a mojito.  The average mojito will have around 200 calories, but if you ask for no sugar or go lite on the sugar/syrup, you can save quite a few more.  Another great option is Margarita’s cousin, the Paloma!  It’s grapefruit juice based and a little less sweet and a bit tangier but will only run you about 165 calories. 

On the list of things to avoid, I would add Pina Coladas, Daiquiris, and definitely Mudslides.  Having heard them described once as an “adult milkshake”, one can assume they are not on this side of healthy.  However, it hurt my heart to find out that they can be upwards of 800 calories!  I would save any/all those drinks for special occasions or make them a one-time per vacation splurge.

However, another good option is sangria.  While still running about 200-300 calories per glass, these last quite a long time as the ice melts and the drink gets watered down.  On a baking hot day these are extremely refreshing and will keep you hydrated as well as not break the calorie budget.

Finally, don’t forget about the good ol’ standby Rum & Diet Coke.  While not super good for gut health, having the occasional soda isn’t going to be too bad.  They’re easy to make, easy to drink and less than 100 calories.  If you want to mix it up, try amaretto and diet coke instead – one of my favorites!  Other options for those that don’t like cola are a vodka and club soda with lime, a hard selzer, or a lite beer. 

Keep track of your drinks and make sure you’re not going crazy. It’s also advisable to drink a glass of sparkling water in between to help slow down and keep you hydrated.  Happy travels!

Cheers! Navigating Winter Drinks

Cheers!  Navigating Winter Beverages

“Alcohol may be man’s worst enemy, but the bible says love thy enemy.” – Frank Sinatra

We are now well into the holiday season, with snow here to stay until at least next March here in Montana.  While I love the holidays (the first snow, the holiday lights, carols playing in stores, etc.) the sheer number of events and parties overflowing with alcohol and endless appetizers can do a number on anyone’s waistline.  As I love to partake in all things merry and bright, I’ve learned a few tricks over the years to mitigate the damage, at least a little. 

First, consider how much you WANT to drink before you go.  Not only could this potentially save you from a lot of excess calories, but drinking more than intended may have disastrous consequences when driving.  So, take a pause before you go, consider how long you will be at the party, if you need to eat something before going, and how many beverages you want to consume.  It’s too easy to over-indulge - you start with a cup of something, get distracted, get a refill, talk to someone else, get offered another refill and so on. 

Second, consider WHATyou want to drink.  In the land of holiday drinks, there are many delicious choices… Sooo many delicious choices!  Which is good, because some drinks can ruin even the most diligent of diets because of the sugar content.   Choosing drinks that are lower in calories, but still give your taste buds a zing, can help keep things in check.  For example, champagne is 90 calories per glass and tastes amazing with just about every food.   Red and white wine are generally low sugar choices that one can sip on throughout the evening.  Any of the hard alcohols (whiskey, bourbon, tequila, etc.) over ice or straight up are around 100 calories.  Vodka soda, gin & tonic, or rum and diet coke are easy to order and won’t break the calorie budget.  For a beer, consider a blonde ale like Kona Light or something like a Corona Premier.  They’re around 100 calories per bottle and significantly better than some other light beers in my opinion.

However, if you’re feeling something more exotic or highbrow such as a martini, keep it clear!  What I mean by that is that if you can’t see through it, it’s probably packed with sugar and calories.  A vodka or gin martini will run you about 175 calories whereas any version of a chocolate martini is going to be over 300 calories per drink.  A White Russian is going to be around 250 calories a glass.  So, if you’re in the mood for something sweeter, consider a paloma (the sour cousin of a margarita) or a mojito.  Both are about 165 calories and pack a ton of flavor if done well. 

Regardless of the libation that you choose, keep track throughout the night and know your limits.  A lot of times I will also throw in a glass of sparkling water with lemon between drinks just to make sure I’m staying hydrated and give myself a chance to avoid the effects of the last drink.  It’s a great way to keep enjoying the party with a drink in hand without things getting out of hand ;). 

Prost! Here's to a holiday season filled with love, cheer, good friends and family.

Chef Jeremy's Black Bean Burgers

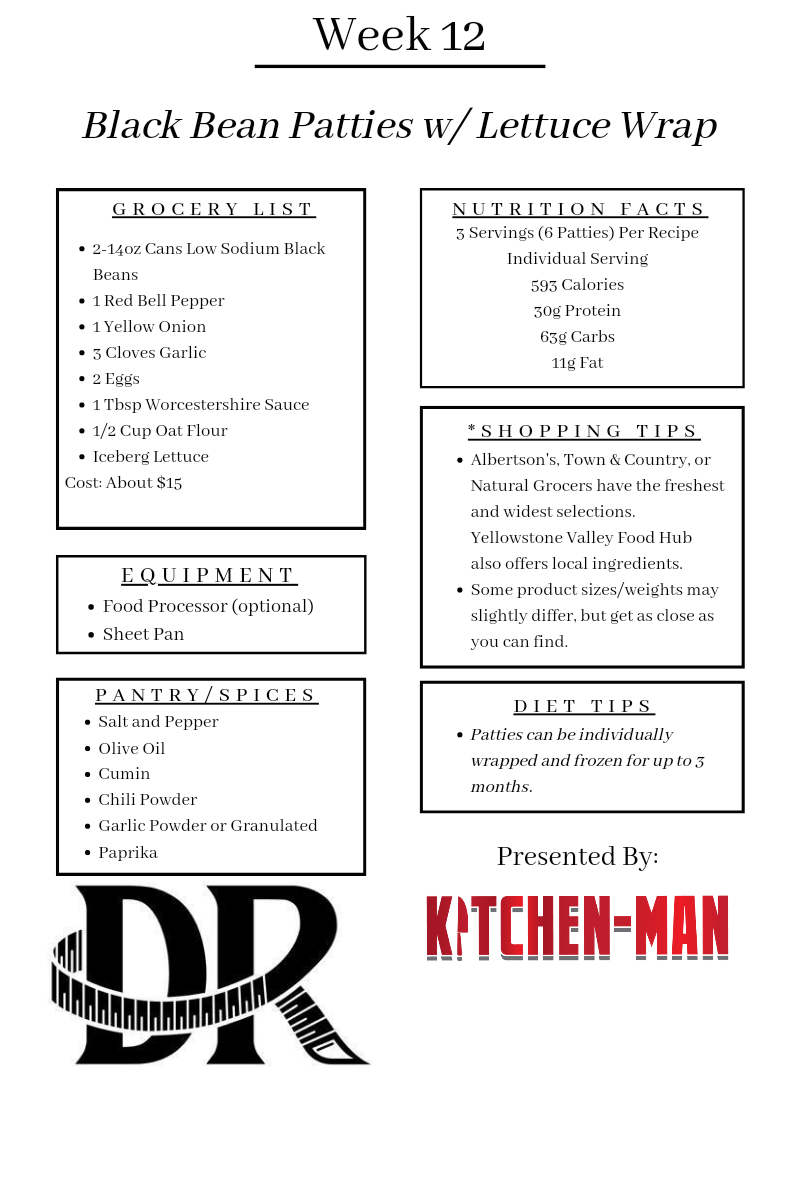
Black Bean Patties with Lettuce Wrap

Black Bean Patties

28oz         Canned No/Low Sodium Black Beans

1 ea          Red Bell Pepper, diced

1 ea          Small Yellow Onion, diced

3 ea          Garlic Cloves

2 ea          Whole Eggs

½ C           Oat Flour

1 Tbsp     Worcestershire Sauce

1 Tbsp     Olive Oil

1 tsp        Cumin

1 tsp        Chili Powder

1 tsp        Garlic Powder

1 tsp        Paprika

1 tsp        Salt

1 tsp        Black Pepper

8 ea          Iceberg Lettuce Leaves, for lettuce wrap

  1. Preheat oven to 325 degrees. Drain and rinse Black Beans, then pat dry with a paper towel. Spread Beans on a baking sheet and bake for 10-15 minutes until slightly dried out.
  2. Chop Red Bell Pepper by removing the stem, seeds, and pith, then cut into small dices and add to a bowl.
  3. Remove both ends and outer layer of onion, then cut in half through the ends. Dice Onion into small pieces then add to the bowl with the Bell Pepper.
  4. Roughly chop 3 Garlic Cloves, then add to the bowl.
  5. Heat 1 Tbsp Olive Oil in a medium saute pan, then cook Onion, Pepper, and Garlic for about 5-6 minutes until soft and translucent. Add Cumin, Chili Powder, Garlic Powder, Paprika, Salt, and Pepper and stir until all veggies are coated.
  6. Transfer sauteed veggies to a food processor or blender and pulse until almost paste-like. Pour into a bowl and mix in the Eggs, Worcestershire Sauce, and Oat Flour.
  7. Add in the Black Beans and mash them with a fork, leaving some larger chunks of Beans for texture.
  8. Form into balls using about 1/3 Cup of mixture for each. You should end up with 6 and any leftover mix can be spread into each of the balls. Form the balls into patties then transfer patties to a baking sheet lined with parchment and bake at 375 degrees for 10 minutes on each side, flipping them will help both sides get that crispy texture.
  9. Use the Lettuce Leaves to wrap 2 of the patties for your meal. Allow the rest of the patties to cool completely, then wrap them individually with plastic wrap and freeze for up to 3 months. Reheat the frozen patties in the oven, microwave, air-fryer, or even on the grill!

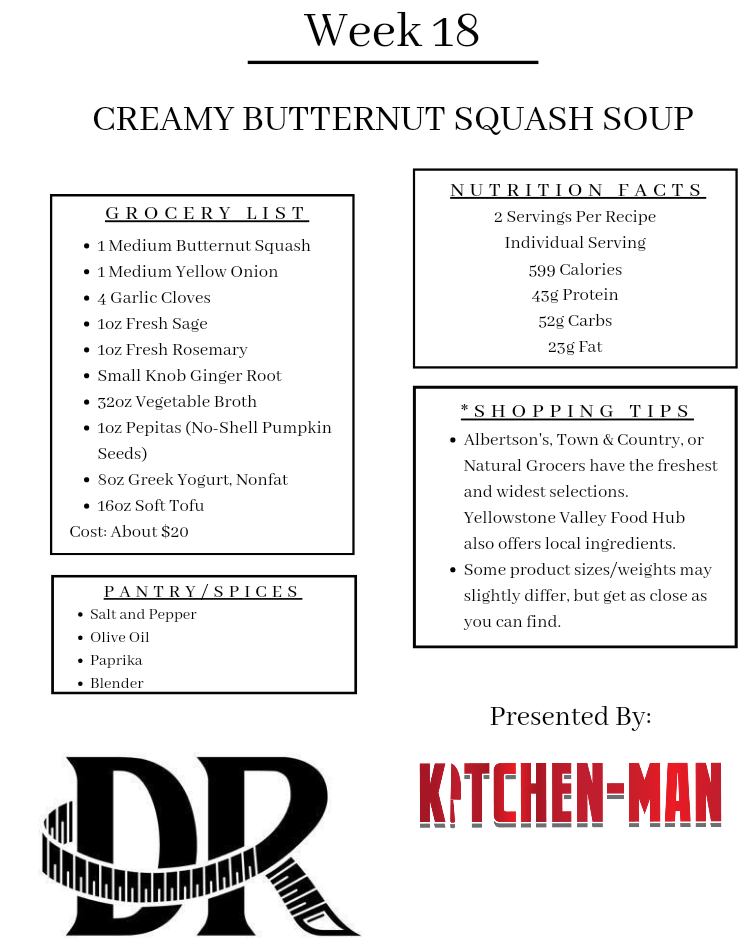
Chef Jeremy's Butternut Squash Soup

weight loss clinic Billings montana physician diet

Creamy Butternut Squash Soup

1 Medium               Butternut Squash (4 cups diced)

1 Medium               Yellow Onion

4 ea                            Garlic Cloves

1 Tbsp                       Sage, preferably fresh but dried is ok

½ Tbsp                      Rosemary, preferably fresh but dried is ok

1 tsp                          Ginger Root or Ginger Paste

3-4 Cups                   Vegetable Broth

16 oz                         Soft Tofu

2 tsp                          Salt

1 tsp                          Paprika

1 Cup                         Greek Yogurt, nonfat

2 Tbsp                       Pepitas, or Pumpkin Seeds with no shells

  1. Start by removing the ends of the Squash and peeling all the thick skin off until all you see is the vibrant orange inside. Cut the Squash in half lengthwise, then scoop out the seeds and “guts” with a spoon. Dice the squash into ½ inch cubes. Heat a large soup pot over medium heat and add 1 tsp of Olive Oil (opt.). Add diced Squash to the pot and begin cooking.
  2. While Squash cooks, cut the Onion into large dices, then add to the pot as well. Also add the 4 whole Garlic Cloves. Because this recipe involves blending, there is no need to cut the smaller ingredients. If you’d like, give the Sage and Rosemary a rough chop and add to the pot.
  3. Peel the Ginger, if you’re using whole Ginger, then roughly chop to measure out 1 tsp and add to the pot. If you prefer Ginger Paste, just measure 1 tsp and add it to the pot.
  4. Allow all the ingredients to cook together for about 5-10 minutes or until Squash is semi-soft, to bring out all the best flavor.
  5. Open the Tofu and drain any excess liquid. Add the Tofu and Vegetable Broth and bring to a simmer. Because the Tofu is soft, you won’t need to cut it, just mash it up into smaller pieces with the spoon or spatula while it cooks. Allow the pot to simmer for about 5 minutes to cook everything soft enough to blend.
  6. Once everything in the pot is cooked and soft, add the hot soup to the blender, in batches if necessary, and blend until smooth. Pour the soup into a large bowl and season with 2 tsp of Salt and 1 tsp of Paprika. Then whisk in the Greek Yogurt until smooth and lighter in color. The Yogurt is mostly to help with acidity and texture, so it can be optional how much you add, just try not to exceed 1 cup or the calories will be over 600 per serving.
  7. Divided the soup into 2 bowls, then garnish each bowl with 1 Tbsp of Pepitas and enjoy!

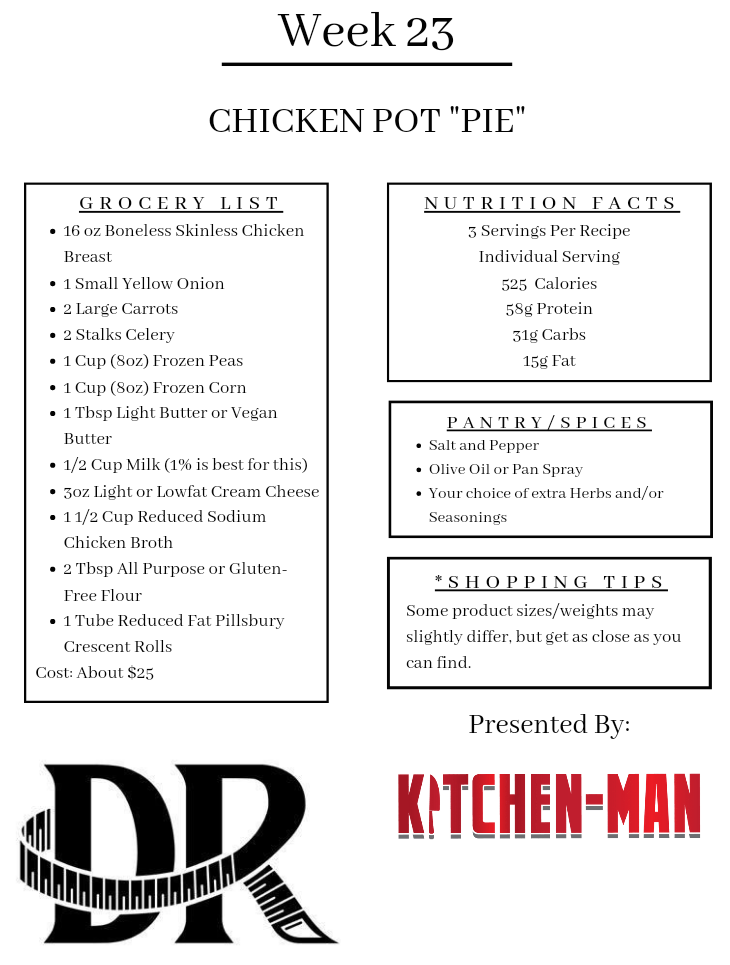
Chef Jeremy's Chicken Pot Pie

Chicken Pot “Pie”

Chicken Pot Pie weight loss Billings montana health diet

16oz    Boneless Skinless Chicken Breast

1 Can   Reduced Fat Pillsbury Crescent Rolls

1 Tbsp Light Unsalted Butter

2 Tbsp Minced Garlic Cloves

½ Cup  Diced Yellow Onion

1 Cup   Diced Carrots

1 Cup   Diced Celery

1 Cup   Frozen Peas

1 Cup   Frozen Corn

½ Cup  1% Milk

3oz      Light or Low-Fat Cream Cheese

2 Tbsp All Purpose Flour

1 ½ Cups Low Sodium Chicken Broth

Salt and Pepper to taste

  1. Preheat oven to 425 degrees. Place Chicken Breasts into a lightly oiled baking pan or dish. Season each Breast with a pinch of Salt and Pepper. Place pan in oven and cook for 25-30 minutes, or until Chicken is fully cooked to 165 degrees internally.
  2. While Chicken is cooking, prepare the vegetable gravy by dicing all of the fresh vegetables into ¼ inch pieces. Measure out the correct amount of Garlic, Onion, Celery, and Carrots, then place them all into a bowl.
  3. Melt the Butter over medium-high heat in a large sautee pan. Once Butter is melted, add the bowl of diced vegetables to the pan and cook for 5-7 minutes or until tender.
  4. Once the fresh veggies have softened, add a pinch of Salt, Pepper, and any other seasonings you wish to use. (I recommend Garlic Powder, Onion Powder, and some Fresh Herbs, but the flavor is up to you.)
  5. Add the Flour to the Vegetables and stir it in, cooking for about 1 minute. Then add the Chicken Broth, stir it in, then allow it to come to a boil. Once boiling, reduce heat to medium and cook for 5 minutes to thicken it into a Gravy consistency.
  6. At this point, the Chicken should be just about done. Remove it from the oven if it is fully cooked and allow it to rest for a few minutes. Turn oven down to 375 degrees.
  7. While the Chicken is resting, add the Milk and Cream Cheese to the Gravy filling and stir it in over medium-low heat. Open the Crescents, roll them up, then place them on a sheet pan with parchment, if available. Bake them in the oven for 11-13 minutes.
  8. Cut the Chicken into small cubes then add it to the Gravy. Also, add the Peas, Corn, and a pinch of Salt and Pepper. Let it simmer until the Crescents are finished.
  9. Once Crescents are done, scoop some of the Pot Pie Filling into a bowl or over the top of a Crescent Roll. You can also eat it like soup and use the Crescent as a dipper, topper, or cube it up and stir it in. This is a fun and simple twist on Chicken Pot Pie, so enjoy it any way you like!

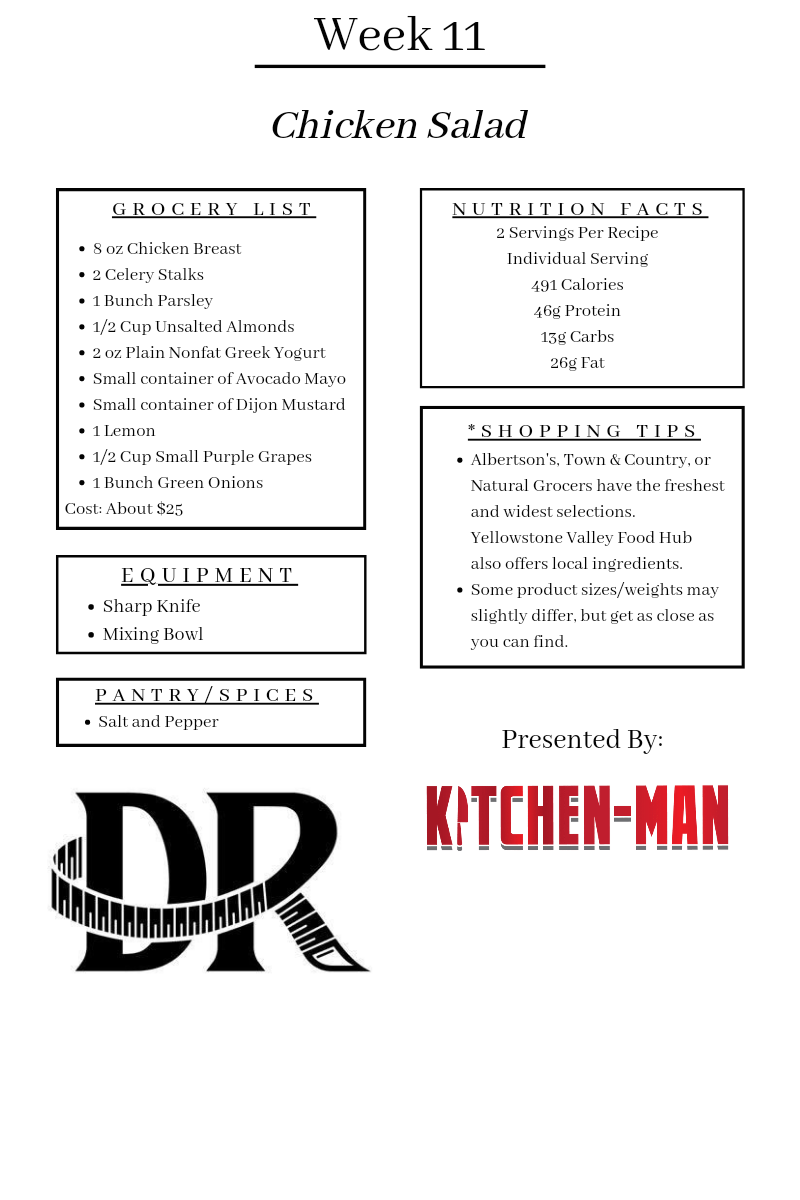
Chef Jeremy's Chicken Salad

Chef Jeremys Chicken Salad

Chicken Salad

8 oz Chicken Breast

2 Stalks of Celery

3 Tbsp Chopped Parsley, save the rest for seasoning the chicken

½ Cup Whole Grapes

¼ Cup Sliced Green Onions

1 Lemon, cut in half

½ Cup Chopped Unsalted Almonds

¼ Cup Plain Nonfat Greek Yogurt

2 Tbsp Avocado Mayo

1 tsp Dijon

¼ tsp Salt

¼ tsp Black Pepper

  1. Before preparing our salad, we will need to fully cook the Chicken Breast. You can do this any way you would like, but I will describe the poaching method. If you have a large Chicken Breast, cut it in half and place it into a medium pot. Cover the Chicken with water and add half of the lemon to the water, as well as a few stalks of parsley. Turn the heat to medium-high and bring the water to a simmer. Once simmering, reduce heat to medium and continue cooking for 10 to 15 minutes, or until chicken reaches 165 degrees. Remove Chicken from the water and place onto a plate in the refrigerator to cool.
  2. While the chicken is cooking and cooling, we will prepare the vegetables. Start by cutting the Celery into thinner sticks, then dicing into small pieces and add them to a mixing bowl.
  3. Remove a small handful of tops from the Parsley and give it a rough chop, then add 3 Tbsp to the bowl.
  4. If you purchased whole Almonds, carefully chop them into ½ cup of finer pieces with your knife, or mash them with a bowl. You can also pulse them in a food processor if you wish. If you purchased already chopped Almonds, simply add ½ cup to the bowl.
  5. Add ½ cup of Whole Grapes to the bowl as well. If you wish to cut them in half instead, feel free. I prefer the “pop” of Whole Grapes in my Chicken Salad, but the choice is yours.
  6. Slice ¼ cup of Green Onions by starting at the green end and making very thin slices until your reach the thick white end. Discard the white ends and add the sliced Green Onions to the bowl.
  7. Add ¼ cup Greek Yogurt, 2 Tbsp Avocado Mayo, and 1 tsp of Dijon to the bowl.
  8. At this point, the Chicken should be cooled. Dice the Chicken into ¼ inch chunks and add them to the bowl.
  9. Squeeze the other half of the Lemon into a smaller bowl, remove any seeds that may have fallen in and add the juice to the salad bowl. Then season everything with a pinch of Salt and Pepper.
  10. Use a rubber spatula or spoon to mix everything together, making sure to incorporate all of the “saucy” ingredients as well. Once you have everything evenly distributed and mixed together, you can eat it as is, or add it to salads, sandwiches, or wraps! Keep in mind, the Nutrition Facts only cover this recipe, so be sure to account for any added ingredients like bread or tortillas. Enjoy!

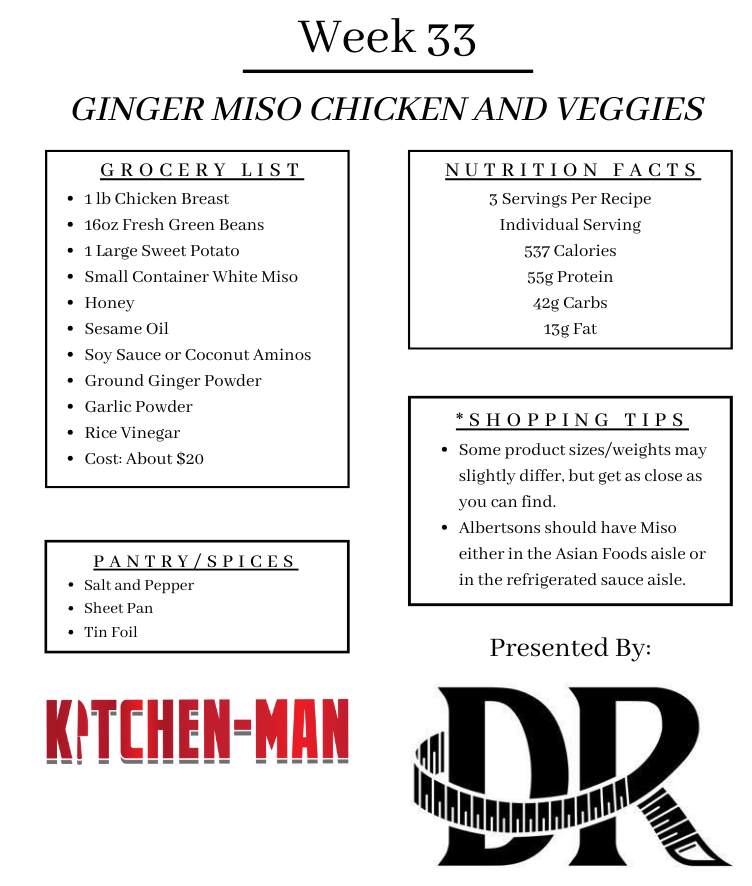
Chef Jeremy's Ginger Miso Chicken and Veggies

Ginger Miso Chicken and Veggies

weight loss doctor clinic Billings montana phentermine

1lb       Chicken Breast

16oz    Fresh Green Beans

1 ea     Large Sweet Potato

2 Tbsp White Miso

2 Tbsp Soy Sauce or Coconut Aminos

2 Tbsp Rice Vinegar

1 Tbsp Honey

1 Tbsp Sesame Oil

2 tsp    Ground Ginger

1 tsp    Garlic Powder

  1. Preheat oven to 425 then start by peeling and dicing the Sweet Potato into 1 inch cubes and add to a large bowl.
  2. Dice the Chicken into the same size cubes as the Sweet Potato and add to the bowl.
  3. In a separate bowl, whisk together Miso, Soy Sauce, Vinegar, Honey, Sesame Oil, Ginger, and Garlic until everything is incorporated and smooth.
  4. Toss the Chicken and Sweet Potatoes in the sauce, then strain off any excess sauce and set aside for later.
  5. Line a sheet pan with aluminum foil, then add the marinated Chicken and Sweet Potatoes to the pan and bake for 15 minutes.
  6. While those are cooking, toss the Green Beans in the leftover marinade and let them soak for the remainder of the 15 minutes, then strain and discard the sauce.
  7. After the 15 minutes are up, stir the Chicken and Sweet Potatoes around and add the Green Beans to the pan and bake for 10-15 more minutes.
  8. Remove from oven and divide the meal into 3 equal portions and enjoy!
  9. You can also substitute Tofu for the Chicken if you want a meatless meal with just as much protein!

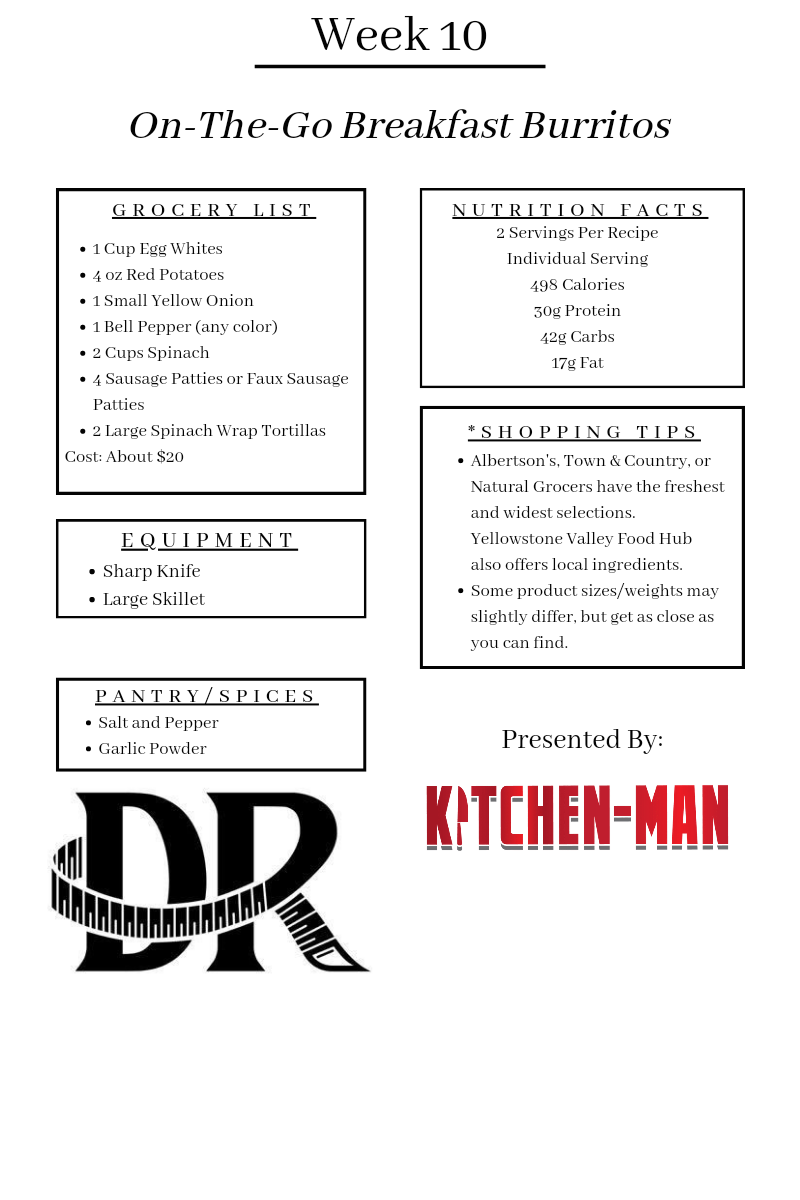
Chef Jeremy's On the Go Breakfast Burritos

On The Go Breakfast Burritos

3 each             Red Potatoes, small diceBurrito Recipe CArd

1 each             Bell Pepper (any color), small dice

1 each             Yellow Onion, small dice

2 Cups             Spinach

4 each             Sausage Patties or Faux Sausage Patties

1 Cup               Egg Whites

1 tsp                Olive Oil

½ tsp               Salt

¼ tsp                Black Pepper

½ tsp               Garlic Powder

  1. Cut potatoes into ¼ inch circles, then cut them into ¼ inch cubes. Heat a pan with 1 teaspoon of Olive Oil over medium heat and add the diced potatoes to the pan. Stir them around to make sure they get coated in a thin layer of oil to prevent burning. Cover the pan with a lid to create steam and continue cooking the potatoes while you prepare the other ingredients.
  2. Dice the onion by removing both ends, then slicing it in half through the root ends. Cut the onion into ¼ inch slices, then rotate the onion and slice the other way to create ¼ inch dices. Add them to the pan and cook with the potatoes.
  3. Cut the Bell Pepper by removing the top. Pull out the center seeds with your fingers, then remove as much of the white pith as you can. Turn the Pepper upside down over the garbage and lightly tap the bottom to knock any extra seeds loose. Cut the pepper in half through the bottom, then cut it into ¼ inch slices. Dice the slices into ¼ inch pieces and add them to the pan.
  4. Add Sausage Patties to the pan and break them into smaller chunks as they cook. Faux Sausage is usually already pre-cooked, so you’ll only need to heat them until they are hot enough to eat. Raw Sausage Patties will need to be cooked until fully browned.
  5. Add the Spinach to the pan and cook until wilted.
  6. Turn heat to medium-low then add the Egg Whites. If you are using whole eggs, separate the yolk from the whites by cracking 6 eggs into a bowl, then gently scooping the yolks out with your loosely cupped hand or half of an eggshell. You can also use liquid egg whites in a carton if you are going for simplicity. Season with Salt, Pepper, and Garlic Powder.
  7. Once the Egg Whites are in the pan, let them cook for about 20 seconds before stirring. This will help you get nice chunks of Egg instead of little pieces. You can also cook the eggs separately in another pan if your wish.
  8. Heat a tortilla in the microwave for 10-15 seconds to get it moist and warm. Add about 1/3 of the burrito filling into the tortilla right in the center. Fold the sides into the middle nice and tight against the filling, the fold the bottom flap all the way over the filling, tight once again, then roll it the rest of the way, tucking in any extra flaps as you roll. Now you’re ready to enjoy, or wrap it in tin foil and freeze until your ready to eat again!
  9. To reheat, place in the oven at 400 for 10-15 minutes or until warm in the middle. You can also microwave it instead, but be sure to remove it from the tin foil first.

Chef Jeremy's Protein Packed Mac (and Cheese)

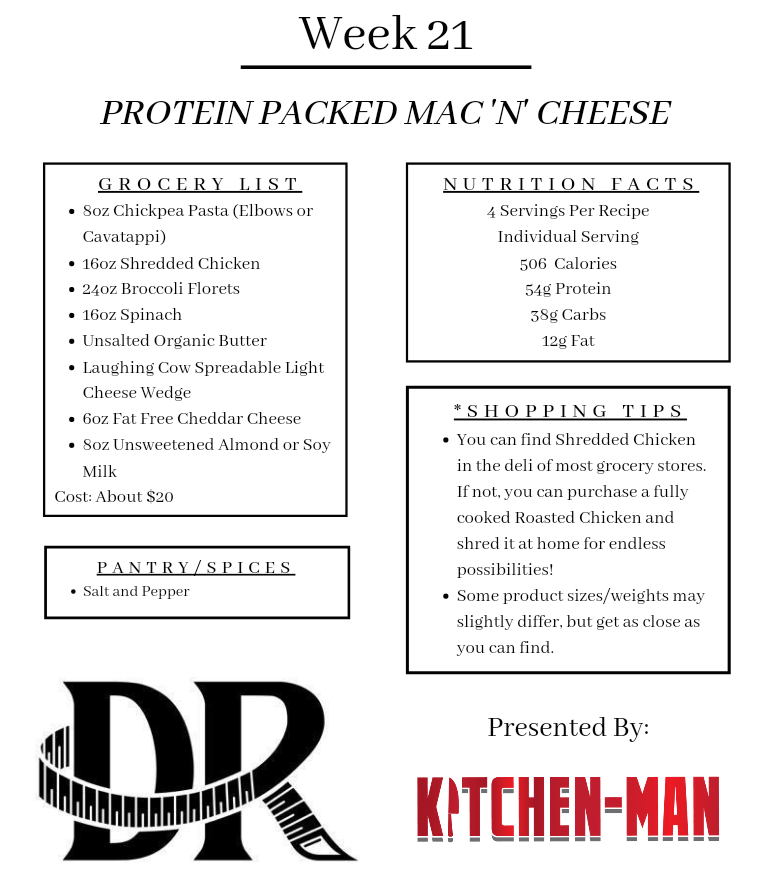
Protein Packed Mac ‘N’ Cheese

(And yes, it really is this good for you!)montana weight loss diet clinic doctor

8 oz                 Chickpea Elbows or Cavatappi Pasta

4 Cups Chopped Broccoli Florets

2 Cups Chopped Spinach

1 ½ oz              Laughing Cow Light Cheese (2 small wedges)

1 ½ Cups          Fat Free Cheddar Cheese

1 Cup               Unsweetened Almond Milk or Soy Milk

1 Tbsp Unsalted Organic Butter

16 oz               Shredded Chicken      

  1. Start by bringing a large pot of water to a boil over high heat. While water is heating up, remove any large stems from the Broccoli and trim any large florets so they are all about the same size, and set them aside for now. You can also chop the Spinach at this stage and set aside until near the end.
  2. Once water is boiling, add the Chickpea Pasta and set a timer for 8 minutes. Slowly stir the pasta for the first 30 seconds to prevent it from sticking to the bottom. After 4 minutes, add the Broccoli to the pot with the pasta, then continue cooking for the remaining 4 minutes. Check the pasta for doneness to your preference then pour Broccoli and Pasta into a strainer.
  3. Using the same pot, over medium-low heat, add the Butter, Almond Milk, and a pinch of Salt and Pepper. Once Butter is melted, add the Pasta, Broccoli, 2 Cheese Wedges, and Shredded Cheese, then stir until the Cheese begins to melt.
  4. Once, the Cheese is nice and melty add the Spinach and stir until it begins to wilt. At this point, you can either add the Shredded Chicken directly to the pot and mix it in, or you can choose to top each bowl instead.
  5. Divide the finished Mac ‘N’ Cheese into 4 bowls, then top each with 4oz of Chicken, if you did not add it to the pot. At only 506 Calories, you have a little wiggle room to garnish your dish with things like Fresh Parsley, Parmesan, or even some Breadcrumbs! Just make sure not to go overboard with the toppings and enjoy!

Chef Jeremy's Vietnamese Beef Pho

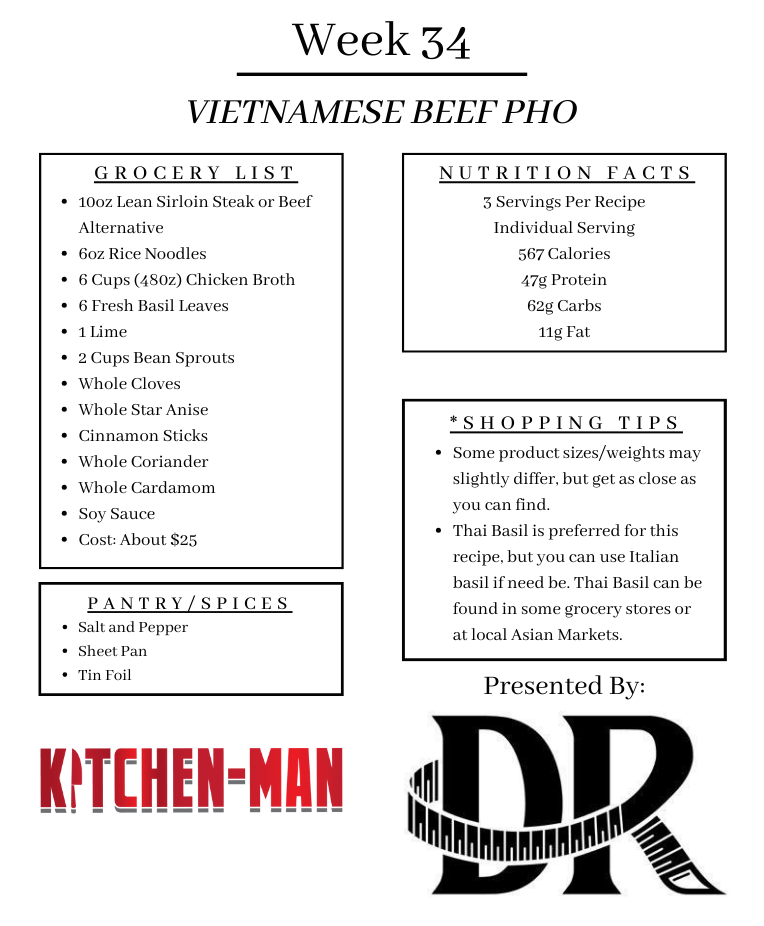
Vietnamese Beef Pho

 Vietnamese Beef Pho weight loss diet plan clinic Billings montana

10oz    Lean Sirloin Beef Steak or Beef Alternative

6oz      Rice Noodles

6 C       Chicken Broth

6 ea     Thai Basil Leaves, or Italian Basil if necessary

2 C       Bean Sprouts

1 Tbsp Soy Sauce

1 tsp    Whole Cloves

1 tsp    Whole Coriander Seeds

5 ea     Whole Star Anise Pods, or ½ tsp ground

5 ea     Whole Cardamom Pods, or ½ tsp ground

1 ea     Cinnamon Stick, or ½ tsp ground

  1. Start by adding the Chicken Broth to a medium sauce pot and bring to a gentle simmer over medium high heat. Add the Soy Sauce, Cloves, Coriander, Star Anise, Cardamom, and Cinnamon and let them simmer in the broth for 10-15 minutes while you prepare the rest of the ingredients.
  2. Pluck 6 Basil Leaves. You can choose to leave them whole, or roughly chop them as a flavorful garnish for your soup.
  3. Slice the Lime into quarters and set aside to add a bit of zesty citrus flavor to your Pho before eating.
  4. Submerge the Rice Noodles in lukewarm water for about 5 minutes to soften up, then divide them evenly into 3 bowls.
  5. Begin heating a small saute pan over medium high heat with ¼ tsp of Olive Oil. Season the Sirloin steak lightly with a bit of salt then quickly sear it for about 1 minute on each side and set aside to rest. Slice the Sirloin Steak into very thin strips. You want them as thin as possible, because we are going to let the heat of the broth cook the rare meat in the bowl just before eating.
  6. Strain the Pho Broth, removing the whole aromatic spices, leaving you with just the flavorful broth. Return to the heat and bring to a boil.
  7. Divide the beef into the 3 bowls of prepared rice noodles, then quickly pour the very hot broth into each of the bowls. Top each with Bean Sprouts, Basil, and a squeeze of Lime and enjoy the tasty aroma of Vietnamese Pho! You can also try this with Chicken or Pork.

Collagen - Does It Work?

When I founded Discreet Reductions I made a promise to myself and to my patients – I would never sell, recommend or require any supplements that I did not 100% believe in.There are so many companies out there that take advantage of people when they’re vulnerable. With Discreet Reductions, I made a vow to never do that to my patients.

My vitamin supplier of choice, as many of you know, is Celebrate. They send all their products to independent, 3rd party verification services who certify that their products contain what they say they do, and in the quantities advertised. They also follow science, data and guideline recommendations when they formulate their products to make sure they’re not only safe, but effective. When Celebrate emailed me to let me know they were now offering collagen peptides, I was skeptical to say the least. I had never looked at the actual scientific evidence behind collagen before, but since I trust Celebrate I figured it was worth a look.

And I was shocked.

First – what is collagen? Simply put, collagen is a type of protein. One of the basic building blocks of life. You think about Whey protein, egg protein, milk protein, soy protein, and so many others. You can add collagen to that list. Collagen protein however is unique – it does not contain all of the essential amino acids. This means you could not live only eating collagen protein, nor could you build muscle. So don’t think of collagen as a protein replacement, but rather it’s another type of protein you can utilize as part of your healthy diet.

Due to collagens unique nature in the protein spectrum, it has some interesting properties. Unlike traditional protein, companies claim collagen can help reduce wrinkles, plump skin and even tackle cellulite. People go as far at using collagen injections under wrinkles to help reduce fine lines and plump their skin. This means there’s money to be made off collagen, and this leads to a lot of false claims and empty promises.

Let’s look at some of the promises made by collagen companies, and then look at what the literature says. Keep in mind that not all collagen is created equal. Collagen is a protein, and like everything in life has a weight associated with it. Some are heavier than others, and they’re all slightly different. Think of it like a zucchini – if you go to the store and buy a 0.5lb zucchini and a 3.5lb zucchini they’re going to taste very, very different. Celebrate uses type I and type III bovine collagen, so we will focus on that. You’ll have to trust me when I tell you the science behind this is incredibly complex, so we will keep this a simple overview.

Claim: Oral collagen supplements reduce joint pain – FACT.There is a study looking at 180 patients who used Type I collagen peptide supplementation. They all had knee discomfort at baseline after squatting. They then took 5 grams of collagen for 12 weeks, and their pain was reassessed at the end of this period. They found that there was a statistically significant reduction in knee pain in the collagen treatment group after 12 weeks. There was then another study done with 13 weeks of supplementation that found the same benefit in the collagen use group.

Claim – Collagen promotes skin health, elasticity and hydration – FACT.In February of this year, a group of researchers analyzed 12 studies that all looked at whether collagen had a beneficial effect on skin health. Across these 12 studies, both type I and type III collagen were assessed. After pooling the results of all 12 studies, the researchers determined that collagen did in fact have a beneficial effect on skin moisture, hydration and elasticity. This led to healthier, tighter appearing skin in the study participants. The researchers note that regardless of whether type I, type III, or both types of collagen were used the results were still beneficial.

Claim – Collagen can help brittle nails by strengthening the nail and promoting nail growth – FACT.There are several small studies that confirm this, but they were all funded by the company that made the collagen used in the study. This means that while the results are positive, they are at risk for being biased. However, their findings do support using a collagen supplement directed at hair, skin and nail health. They found that over 4 weeks of taking collagen, their study participants saw a 12% increase in nail growth rate, a 42% decrease in broken nails and 80% of the study participants said they felt the collagen positively impacted their nail health.

Based on the evidence I can find, I feel comfortable recommending Celebrate’s collagen supplements to my patients. I recommend their Collagen Peptide for skin, nail and joint health. Given the overall positive results of numerous studies out there, it does not seem that you need to take a collagen supplement specifically formulated for one goal, such as joint health or skin health. Rather, it appears that type I and type III collagen are uniformly beneficial for skin, joints and nails. And it gives you an extra dose of protein for your day, which will help promote lean muscle growth and is a beneficial part of any weight loss plan.

You can buy our recommended collagen (and other Celebrate products) on our website HERE. And if you're an Active Patient in our practice, remember you get discounts every day at our Patient Pricing Protein Store.

If you have any questions about collagen, or if you would like to read the studies I reference above, please email me atThis email address is being protected from spambots. You need JavaScript enabled to view it..
Game Changer (Intermittent Fasting)

Game Changer

People often ask me what is different about my program than other “diet” programs.  Why will my program work when all others have failed them?  What special food do I use, what magic pill do I prescribe, what cleanses, shakes or juices do I have that will do the trick? 

The answer is complicated because humans are complicated.  Any program that offers a simple solution is probably not all it promises to be, except if that promise is a box of food and an empty wallet.  What I offer is a solid understanding of human physiology and how to use your body’s normal responses to get to your desired outcome: weight loss. 

This is different for every person and there are so many variables (food, medicines, exercises, hormones, etc.), but a simple example is using intermittent fasting to specifically reduce insulin levels which improves weight loss. 

Intermittent fasting has been used for centuries by many different cultures for health and religious reasons.  It simply refers to a time where a person abstains from eating.  In the Muslim religion, Ramadan is a good example.  During the time of Ramadan (April in 2022), Muslims do not eat from the hours of sunup to sundown.  In the U.S., intermittent fasting is often used for health purposes with common periods of fasting lasting 16 to 24 hours. 

How does it work?  Each time we eat, we cause our insulin levels to go up.  How high and how fast the insulin spikes are dependent on the food we eat.  A loaf of bread will cause insulin to go up faster and higher than an apple.  Insulin is the fat storing hormone in the body.  It allows our body to bring glucose from the bloodstream into the cells and store the extra calories (energy) as fat in our cells.  We would die without insulin.  It is what allows us to store energy (fat) for use in times of famine or starvation. 

However, insulin also has a secondary effect.  When insulin levels are elevated, it does not allow us to access our fat stores for energy.  Insulin is focused solely on storage of energy.  Most of the time this would be fine as usually when your insulin levels are high you have just eaten and have plenty of energy from the calories you just ate.  However, we are now finding significant numbers of people who are insulin resistant and have elevated levels of insulin all the time.  This means they cannot access their fat stores for energy, making it hard, if not impossible to lose weight. 

Correctly identifying and treating people with insulin resistance is crucial to their success in weight loss.  Many of these patients have diabetes and pre-diabetes, however a portion do not and only show elevated insulin levels or blood sugars that easily rise and fall.  By running the appropriate tests and determining a patient’s insulin sensitivity, I can make recommendations that will drastically improve their likelihood of long-term successful weight loss. 

One dietary treatment is intermittent fasting.   Intermittent fasting allows insulin levels in the blood to fall and the body to access fat stores for energy.  The longer the time in the fasting phase, the longer the body has access to fat storage.  This not only leads to weight loss but improves the body’s sensitivity to insulin when it is present, reducing patients’ Hemoglobin A1C’s (average blood sugars over 3 months).  Intermittent fasting can even help prevent diabetes. 

When I talk with patients about intermittent fasting, I help them understand that there are many ways to go about their fasting periods.  Many are worried about being hungry or “starving” and certainly, that is NOT our goal.  In fact, diets that cause the body to go into “starvation mode” – such as many very low calorie, prepackaged fad diets cause the body’s metabolic rate to slow way down.  This is the opposite effect of what happens with intermittent fasting when properly done under a physician’s supervision.  Our goal is to increase your metabolic rate (burn more calories) while allowing your body to access your fat storage for the additional energy it needs.  No one needs to “starve” and there are many tools to help you achieve your goals such as proper meal timing, maintaining hydration and electrolyte levels and even foods such as FAST bars. 

Intermittent fasting isn’t for everyone, but it is one tool in a wide selection of helpful techniques known to physicians practicing medical weight loss.  So, when people ask how my program is different, my answer is that knowledge is the game changer.  Having a physician’s understanding of human pathophysiology and additional training in obesity medicine is the magic bullet.  After that, success involves just a tincture of time and a motivated patient.

Homemade Does NOT Equal Healthy

Homemade Does NOT Equal Healthy

Every evening as I’m scrolling through Facebook, I’m reminded of the VAST amount of misinformation that is out there on social media.  I scroll past dozens of recipes that are supposed to be “healthy” because they use (some version) of fresh ingredients and are homemade.  This got me to thinking, “I wonder how many people actually make these recipes thinking they are good for them?”.  The answer would probably be very disheartening if I were ever to find out.  Between the gallons of oil and whole milk, vats of butter, cheese, and pounds of pasta, ground beef and potatoes there are more than enough calories and saturated fat to ruin someone’s best efforts at working towards their weight loss goals.  So, I wanted to dispel some of the myths around home cooking.

#1:  Your grandmother’s recipe may or may not be the secret to living a long healthy life. 

Grandmothers are an amazing resource in resourcefulness!  Many, mine included, weathered the depression, multiple wars, and the 70’s without batting an eye.  They did amazing things with what they had.  However, that often called for things like Spam, hot dogs, Jello, heavy cream, butter, and gravy.  Ham-Jello Salad anyone?.. Beware of these heavy, stick to your ribs meals.  They were meant for a different era when food may not have been as plentiful.  Instead, when looking through old recipes, stick to vegetable-based dishes like my husband’s baba’s borscht recipe she brought with her from the old country (Ukraine).  I’ve included it at the bottom because it’s an amazingly hearty dish that tastes fantastic and is extremely healthy!

#2.  If you’re pouring things out of a bag or box, it’s not homemade. 

The best example I have seen recently was a macaroni and cheese casserole.  1 box macaroni (poured in baking dish) + 3 packages of pre-shredded cheese + ½ gallon of whole milk and some heavy whipping cream for good measure, baked for about 30 minutes = “homemade” meal.  I’m sure it tastes wonderful, but this was no better than any pre-packaged frozen meal pulled out of the freezer section.  Real homemade meals should involve some cutting, slicing and dicing as well as some peeling, chopping and sauteing.  If you can make the meal with one hand, it’s probably not healthy.  Now, pouring out a can of beans or some frozen veggies from a bag is fine, but don’t be fooled by meals that rely on highly processed ingredients!

#3.  If it says EASY or QUICK, those are generally not code words for healthy.

Example A is an “Easy Baked Chicken Parmesan Casserole ready in 30 minutes!” that I found on Facebook.  The only green food in this recipe was the teeny tiny little basil leaves on top of the casserole for a garnish.  The rest of the ingredients were a box of pasta, a can of Prego pasta sauce, some dried herbs, a bag of pre-shredded parmesan cheese and some chicken.  Just for fun, I put this into MyFitnessPal to see what the nutrition info would be.  If we divided the recipe into 6 servings, it would be over 1100 calories and over 3 grams of sodium per serving!  Ouch! 

So, what can we do?  First, look for recipes with lots of colors!  This usually indicates a fair number of fruits and vegetables in the recipe.  We want the focus of the meals on vegetables and fruits and other whole food ingredients like lentils, beans, ancient grains, fresh meat or seafood.  Avoid recipes with lots of jars, boxes and bags as these usually contain highly processed foods.  The exception being canned beans or tomatoes, canned or frozen vegetables, and dried ingredients like sundried tomatoes, herbs and spices, or broth.  Finally, be willing to dedicate a little bit of time (~30 minutes or so) to preparation of a healthy meal.  Anything worth having takes time and effort.  I generally allocate about 30 minutes to prep a healthy home cooked meal at night.  If 30 minutes is just not possible, salad is a great option that you can whip up quickly – usually less than 15 minutes and there are hundreds of fantastic salad recipes on the internet.  Additionally, most grocery stores have pre-chopped vegetables now that you can use in any recipe you want.  Grabbing a few from the grocery store and freezing any leftover veggies will make it easy when you find a recipe you like, now that you know what to look for. ?

Intuitive Eating: Fad or One Big Misunderstanding?

Intuitive Eating: Fad or One Big Misunderstanding?

This week at work I spoke with quite a few patients about the concept of intuitive eating.  Hear me out, this is NOT what you think! 

Most often, when people talk to me about intuitive eating, they talk about “giving your body what it wants”.  This could mean eating a bag of potato chips in one sitting or a carton of ice cream.  Often this is with the misperception that if your body is craving something, it must have some deficiency in some nutrient or vitamin.  This can happen for medical reasons.  A great example is Pica in pregnancy.  Iron deficiency in pregnancy can lead to women desiring to eat nonfood items such as ice, dirt, etc. to try to meet their body’s need for iron, otherwise known as Pica.  However, I will tell you that for most people, this is not the situation.  I crave jellybeans, chocolate cake and Twizzlers, but I can tell you my body has never once had a deficiency of artificial food coloring/flavoring or any nutrients in those foods (if there actually are any). If you eat the standard American diet, you are likely NOT deficient in any micro or macronutrients unless you have another underlying condition (pregnancy, celiac, etc.).  So, I recommend starting any dietary changes with the assumption that you are well nourished.

More enlightened nutrition experts have suggested that intuitive eating is about recognizing your hunger, feeling your “fullness”, and coping with your emotions and feelings without using food.  I would agree to some extent with all those suggestions.  I think each of those things is critical to having a healthy diet and knowing when and how much to eat.  However, I don’t think it’s the whole story. 

So, what does intuitive eating mean?  I believe it means not only paying attention to what you desire, your feelings of hunger and satiety, and learning alternative coping mechanisms for emotional distress, but paying attention afterward to what the effects of foods are after you eat them.  What keeps you full and satisfied?  What powers your workouts best?  What foods or beverages cause you not to sleep as well? What is the best timing of your meals during the day and what is the ideal amount of food?  Listening to what your body tells you after you eat is just as important as recognizing hunger and fullness.  One of the best examples of this was brought to me last week by a patient.  She works nights and tells me that when she gets home after a long night and is hungry, she’s found that if she eats an egg frittata with veggies she sleeps well during the day and wakes up ready to go to work.  She noted that eating a sandwich doesn’t produce the same result.  After a sandwich she often wakes up hungry and still feeling tired.  Listening to and learning our body’s needs helps us intuit on future occasions what is going to best serve our health.  In this case, this patient now knows that when she gets home from a long night at work, her best chance of feeling great and being her best self comes from eating a combination of wholesome, fresh foods.  

Intuitive eating also means drowning out the outside messages from the media about what constitutes a health food.  Now, more than ever, the supermarket shelves are full of products with all types of eye-catching health claims on them.  Labels such as “natural”, “fat free”, or “no cholesterol”, and catch phrases like “super foods” or “super greens” are everywhere and imply the product is healthy, but the reality almost always falls short.  Intuitive eating means ignoring the baseless claims (i.e. granola bars with “healthy” printed on the label or supplements promising more energy) and eating the foods we know are good for us – fruits, vegetables, and other whole foods that come from the earth.  Real food doesn’t need a label telling you it’s healthy, natural or any other seductive descriptor.  In fact, real food doesn’t need a label at all.  We don’t need labels on apples, potatoes, milk, eggs, fish, chicken, etc. to know what they are or that they are natural and healthy for us to eat.  Our intuition tells us that they are good for us.  Why?  Because when we eat whole foods in a balanced meal, we feel good and our body remembers that feeling.  Like our intuition around other experiences/people/things, intuitive eating comes from increasing our perception of our own reactions and being aware of others’ behaviors/claims so that we can make better choices about what foods we really “want” to eat. 

So, consider trying real intuitive eating in the future to see what you can learn about yourself, your body and its needs.  I’m not saying that intuitive eating will cure all our cravings, late night binges, or fast food on the run.  However, listening to your gut and ignoring the flashy claims can go a long way towards making better, healthier eating decisions. 

Just some food for thought. ;)

Italian Bean Skillet

1. Start by adding 3 cups of vegetable broth and 3 cups of water to a medium pot and bring to a boil. It would be best to get this on the heat about 5 minutes before the video begins. Measure out 1 cup of Wild Rice and rinse under cool water in a strainer. Once liquid boils, add the rice and reduce heat to medium or low to maintain a simmer. This will take about 40 minutes to cook, so keep an eye on it to make sure it doesn't boil over.

2. While the rice cooks, prepare the vegetables. Start by cutting the onion into medium dices and set aside. Then cut the zucchini by slicing it in half lengthwise, then into 1/4 inch thick half-moons. Lastly, dice the tomatoes into a similar size as the onions.

3. Heat 2 tablespoons of vegetable stock in a large saute pan over medium heat and add the onion, zucchini, and tomatoes. Let these cook for 5-1 O minutes to soften up and absorb the stock. Add a tablespoon of stock at a time if the pan becomes too dry.

4. While the veggies cook, begin opening all your canned goods. Drain the chickpeas and the cannellini beans, and set aside. It is fine to mix them together. Pluck the Rosemary and Oregano off the stems until you have about 2 tablespoons of each. Put the fresh herbs into a pile together and give them a good rough chop. Measure out about 2 cups of kale and rough chop that as well. Rough chop just means that the cuts do not have to be consistent, we just want to size the ingredients down a bit.

5. Your veggies should be soft by now, so add the herbs and let them cook with the veggies until they become aromatic. Once the aroma of herbs has filled the room, then add the kale and cook for a few minutes until soft. Then add the chickpeas, cannellini beans, and tomato sauce to the pan. turn the heat to medium-high and bring to a simmer. There is no need to cover this pan as we want the moisture to evaporate a little.

6. Allow your sauce to simmer consistently until the rice is fully cooked. Wild Rice will always have a bit of a chew to it, but you can tell it's done if the black outer shell has cracked open to reveal the white rice in the center. Whether your rice is done or not, no worries, add it to the veggie sauce and continue cooking until done to your liking. Add 1/2 teaspoon of salt, stir, then divide into 3 or 4 portions, depending on your appetite. I've measure out the nutrition facts for 3 servings, but wild rice is as filling as it is packed with nutrients. Enjoy!

Mission Impossible:  Grocery Store Savings

I’ve been amazed (well, maybe more like horrified) at the cost of food at the grocery store lately.  Even with clipping coupons, watching for sales, and avoiding the impulse buys in the check-out line, I can’t seem to get out of the grocery store for less than $40 these days…no matter what I came in for!  Normally, I am all about paying for high quality, healthy food, but a recent particularly wallet damaging trip to Natural Grocers made me reassess my purchases.  So, after sitting down and doing some number crunching and evaluation of our family’s habits and wastes, I decided to let you all in on my findings on how and where you might be able to save at the grocery store.

First, go in with a plan.  This is probably at the top of the list on every savings hack’s website, but it’s for a reason.  The times I have spent the most are when I didn’t plan what/when we were going to be eating at home that week.  It starts with good intentions – “I’ll just pick up some veggies for the grill, some fruit for after dinner, some protein if we decide to grill…” and suddenly we have a fridge full of miscellaneous items that may or may not all get eaten before they spoil.  When I walk in with a clear idea of what I want and how much and what meal it will be used for, almost nothing goes to waste.  The average American household throws out 25% of its food purchases and a family of four will throw out more than $1600 of food each year.  This is a serious amount of cash that could (and should) be spent on things like family vacations, braces for little Jimmy, sports equipment, or really anything better than making more garbage.  So, next time you’re heading to the grocery store, go prepared with a list!

Second, consider the cost of prepared food.  I’m a decent cook (meaning I can follow a recipe) and make almost all of our meals at home.  However, I will admit to taking shortcuts on occasion and recently those short cuts have been adding up.  For example, to buy a small jar of organic pesto at Albertsons, it costs $6.99.  I did an experiment this weekend and for a grand total of $0, I made the same pesto from the basil in my planter and supplies I had at home.  It took a total of 8 1/2 minutes for me to collect the supplies, throw it in a blender and have pesto.  Yes, I actually timed myself.  The dishwasher did the dishes and I froze the leftover pesto.  There are so many items like this that I’m tempted to buy out of convenience, but really take almost no time or money to make.  Big mark ups on items like vegetable or chicken broth, bread (especially with a bread maker), pizza dough, salad dressing, pasta or pizza sauce, salsa or guacamole, and many more don’t need to inflate my grocery bill.  Often, my homemade version tastes better and is almost definitely healthier without the excess preservatives, salt, and calories.  So, consider what you might want to make yourself.  Even if it’s one item, it might save you $50-100 over the course of a year depending on the markup. 

Third, watch where you buy things.  Very soon after moving to Billings many years ago, I realized that the grocery store was NOT the place to buy fruit.  WAYYY overpriced, often spoiling, and many times not organic, the grocery store fruit looked sad and almost nothing like what I was used to in Arizona.  Then, I found Costco.  Costco offered great prices on delicious berries, melons, and bananas.  They have lots of options that change depending on the season and many of their fruits are even organic.  At the time, they slashed my grocery budget the produce department by at least half.  In the last year, Misfits Market has become my go to option in the winter months.  They are an online grocery store that sources produce and other goods from around the country that will be thrown out due to either being unusual looking (think of a carrot shaped like a C or a melon with a big divot in it) or coming close to their expiration date.  In the dead of winter here in Billings, you can get a ripe melon, a delicious mango or ready to eat cherry tomatoes delivered right to your door.  The best part is that the prices are extremely reasonable.  You do pay a $10 shipping fee, but that is more than made up for by the steep discounts on much of the produce.  So, consider a quick side trip to a different market for items with big savings the next time you’re out grocery shopping.

Fourth, save everything!! My husband laughs at me because our freezer is filled with miscellaneous odds and ends – baggies filled with herbs, the remains of a can of chilis in adobo sauce, half a portion of an enchilada casserole, two icecube’s worth of pesto, part of a jar of marinara sauce, an extra block of cheddar cheese…you get the picture.  I’ve realized over the years that the freezer is my salvation.  It can hold a treasure chest’s worth of overzealous purchases or leftover bits of things that I can use for later.  That marinara sauce may come in handy when it’s just me home alone one night for an easy pasta dinner.  The block of cheese will thaw and melt just fine to put into bean enchiladas.  Those cubes of pesto can be thawed and go into an omelet one weekend.  It also works on large grocery store purchases, either from disorganization (see paragraph 1) or planned.  Good deal on broccoli today?..maybe I’ll buy two heads and cut up and freeze the second to add to a stirfry one night.  The lesson here is that we often throw out odds and ends just to buy them again later.  Think about whether something can be used again and if so, toss it in a Tupperware and throw it in the freezer.  Many times we will have a portion of a meal leftover that we throw into the freezer.  At some point, we have one of those days where nothing has been planned for dinner and we end up having a leftover night made up of 5-6 different dishes.  It’s not glamorous and often it’s not even cohesive (a side of soup with your enchilada casserole anyone?) but it gets the job done and usually turns out pretty well anyway.

While I could go on and on about ways to save at the grocery store, I will leave you with one more tip.  Consider shopping your own pantry.  Pretty much any day of the week I have enough food in our pantry to make a very lovely meal at home without having to go to the grocery store.  In fact, I would bet many families do.  Too often we forget what we have at home and it may expire or sit in the pantry without being used for months.  Before making your list, check out what you have in the cupboards and making a meal or two from your supplies.  You might be shocked at how much that can save you in the check-out line.  While you’re at it, you might want to check your freezer as well ?

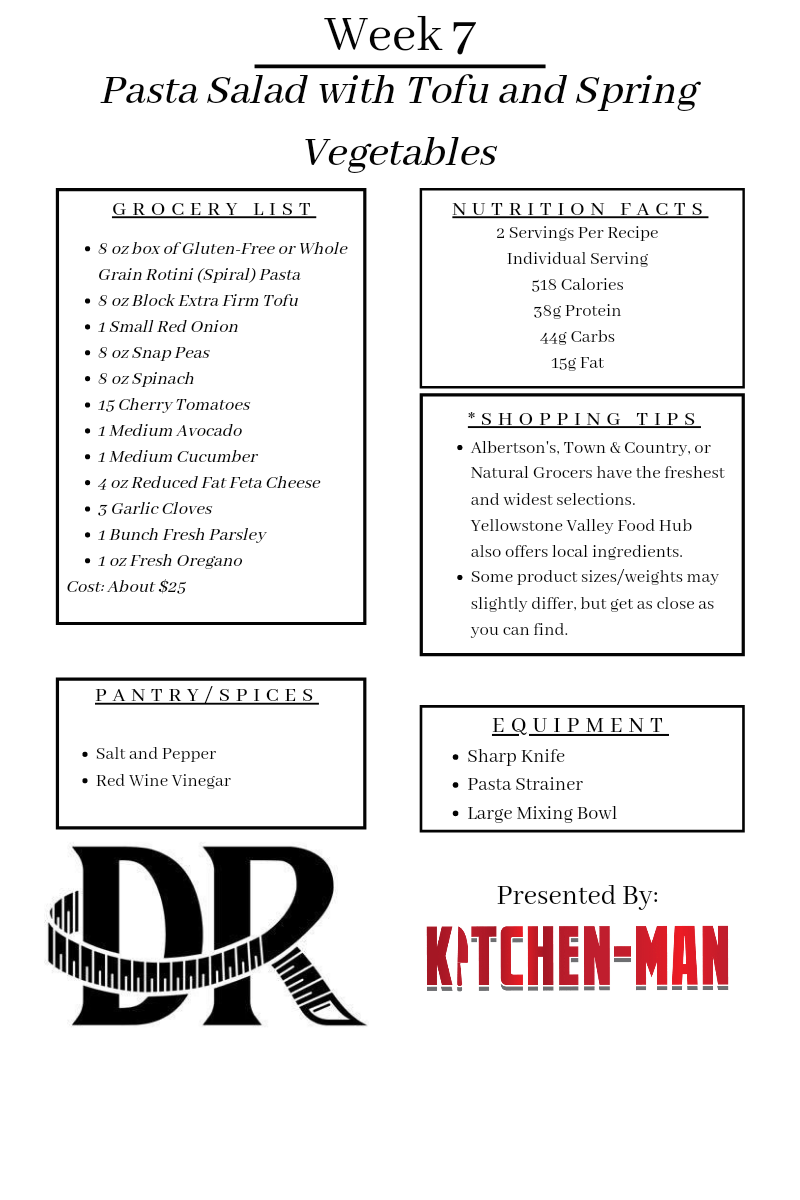
Pasta Salad with Tofu and Spring Vegetables

 Pasta Salad with Tofu and Spring Vegetables

  1. Start by boiling the pasta, because we want it cooled off when we add it to the vegetables. Bring a medium pot of water to a boil over medium-high heat. Once boiling, add 1 Cup of Rotini Pasta to the water and boil for 6-8 minutes, depending on your preference of texture. 6 minutes will be more al dente and chewy, 8-10 minutes will result in much softer pasta. You can always taste one before straining to find your favorite texture. While this boils, we will start cutting vegetables, so set a timer to remind you about the pasta and remember to stir every minute or 2. Once cooked, pour into a strainer, shake it up to remove any excess water, then add 1 teaspoon of Olive Oil to prevent the pasta from sticking together. Leave in the strainer to cool.
  2. Next, we will prepare our vegetables. For this, grab a large mixing bowl to add ingredients into once they have been cut. Start by cutting 1 cup of Snap Peas into thirds, or smaller bite-size pieces, then add them to the bowl.
  3. Cut 15 Cherry Tomatoes in half, then add them to the bowl.
  4. Slice the ends off of the Red Onion and cut in half through the flat ends. Lay one half of the onion flat, then cut into very thin slices and add it to the bowl. The onion is pretty strong, so you may not need the other half in this recipe. Luckily, onions are great in any recipe, so feel free to save the other half for another meal!
  5. Remove the ends of the Cucumber, then cut in half lengthwise. Cut the Cucumber into thin, half-moon shaped slices and add to the bowl. Once again, if you have a large Cucumber, you may be able to save the other half as a snack for later.
  6. Open the package of Extra Firm Tofu, and drain any excess water. Wrap the tofu in a paper towel to absorb any extra moisture. Once it feels dry to the touch, cut the block into small quarter inch cubes. Add 1 cup of tofu cubes to the pasta salad and reserve the rest.
  7. Remove some of the leaves from the Parsley and roughly chop them into fine pieces. Measure out ¼ cup of chopped Parsley and add to the bowl. Reserve any leftover parsley and place into a plastic bag with a paper towel to preserve freshness in the fridge.
  8. Roughly chop 2 Tablespoons of Fresh Oregano and add to the bowl. Store the extra Oregano in the fridge.
  9. Remove the skin from 3 cloves of Garlic and mince by chopping them into very small pieces, then add to the bowl.
  10. Add ½ cup of Feta Cheese to the bowl.
  11. Cut the Avocado in half by running your knife through the middle of the top until your knife hits the pit in the middle. Once you feel your knife hit the pit, rotate the Avocado around your knife until you’ve cut all the way through. Grab each half of the Avocado and gently twist until one half separates from the pit. To remove the pit, lightly hit it with the blade of your knife and twist. The pit should stay in the knife blade and then you can discard it. Cut one half of the avocado into cubes by gently running your knife through just the light green part until you feel it hit the inside of the skin. Do this in vertical lines, then horizontal lines. Try not to cut through the skin, because we will scoop the edible portion out with a spoon. Add the first half of diced Avocado to the bowl.
  12. Now take the other half of the Avocado and scoop it into a separate, smaller bowl. Add 3 Tables spoons of Red Wine Vinegar and 1 teaspoon of salt to the Avocado, then mash it up with a fork until it resembles loose guacamole. If it seems too thick, add another splash of Vinegar or even some Lemon Juice. This will be our “sauce” for the pasta salad, also known as Vinaigrette.
  13. Pour the Pasta from the strainer into the large salad bowl. Use a spoon to gently mix everything up, then add the Avocado Vinaigrette and mix until incorporated.
  14. Now, simply add a scoop or two to a bowl and enjoy!

Bonus Tip: If you noticed, we have quite a bit of leftover veggies and ingredients. This is very common when preparing smaller portions of meals, because we often don’t need an entire onion or 30 tomatoes. The challenge of any chef or home cook is to find ways to repurpose these leftover ingredients to create something else instead of throwing them in the trash. Therefore, my test for you this week is to find ingredients in your fridge or pantry and use them to create something new! Good luck, Chefs!

Patients Not Customers

My last day of work was April 3rd, 2021.  I remember it well.  I went home and poured my husband and I a shot of Johnny Walker Blue that we had bought for the occasion.  It was a celebration of the end of my clinical career in medicine.  Over a decade gone since I graduated residency.  Down the hatch it went, burning the whole way down. 

That nasty turpentine like taste stayed with me long after that night.  In fact, whiskey happened to be a great metaphor for my last 10 years in medicine.  It’s sterile, hard to swallow, heartburn inducing nature is either something you can get used to or a bitter liquid that gets harder to choke down every day.  Indeed, medicine today has gone so far away from the sweet, bubbly, prosecco like quality that we all either remember or expected to find that I doubt you could locate anyone other than medical students who are still excited about the practice.  The ability to save someone’s life, change someone’s family tree or work with them to meaningfully improve their quality of life lies in stark contrast to the day-to-day existence of documentation requirements, billing and coding denials, HIPAA regulations, organizational KPIs, online training, etc. etc. etc. 

No one really knows when the wine changed to whiskey, but the insidious nature of it indicates it started with our language.  Years ago, when physicians were owners of their clinics and leaders of their hospitals, people were patients and not customers.  Patients were neighbors, friends, coworkers, and family.  Doctors provided care, not services.  Surgeons performed surgery, not billable procedures. The focus was on how people felt, not outcomes.  The language described what people did, not what insurance billed. 

When our language changes, so does our perspective.  With layers of administration, come new terms like ROI, value-based care, market share, etc.  Business terms previously had no business in the doctor patient relationship and in my mind, they still shouldn’t.  We all know this instinctively, so we change our wording to make the words that burn more palatable and easier to swallow.  Sales becomes marketing, payment becomes compensation, and mistakes become medical errors.  In the numbing process, we lose the humanity of medicine.  Hugs become handshakes, time in the room gets shorter and everyone feels rushed.  No one (doctor or patient) feels heard.  Interactions become about conveying information and less about the feeling and living.

April 3rd, 2021 was my last day of work.  My last day of working within a system designed to separate the patient from the doctor.  After 8 months of decompression, deep introspection, and a lot of long runs, I was ready.  In 2022, I started a clinic designed to strengthen the doctor patient relationship.  Discreet Reductions is my answer to the question “What will I do now, now that I can do anything?”.  There are no layers of staff between myself and my patients.  When you call, you talk to me.  If you email or message through the patient portal, I answer.  I take your vitals, examine you, listen to your concerns and dispense medications and advice.  Discreet Reductions is not a business, but a passion project about bringing the joy back to medicine for both the patient and the doctor.  I want to show the world that the impossible can be done.  That medicine is not a business but can pay a fair wage.  That we should work towards improving health, not treating disease.  That while the doctor customer relationship burns, the doctor patient relationship can still effervesce. 

glass of whiskey with ice on a wooden table surrounded by smoke